Tiếng Việt
Get Tracepen on the SketchUp Extension Warehouse (free) →
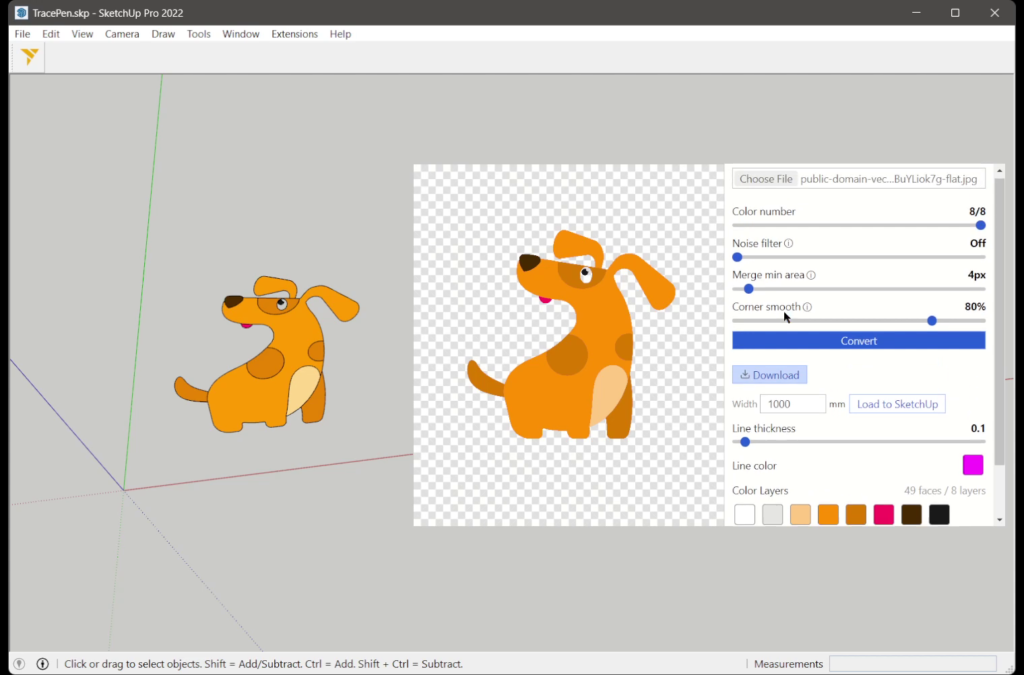
Tracepen converts an image to SKP geometry: it traces a PNG or JPG into native SketchUp faces, one group and one material per colour, straight inside your open model – no .skp file to import and nothing to redraw. It is built for logos, icons and flat graphics you want as real geometry to push-pull or paint, and it is a tracer (colour quantisation plus Potrace curve fitting, no AI), so you get flat faces on the ground plane, not a 3D model of the picture.
Free with every feature and full colour, with a few loads into your model a day on a free 3dshouse account. Tracepen Pro removes the daily limit: $80 one-time, and the same purchase covers the web app and the Blender add-on.
Video
How to convert an image to SketchUp faces
- Open Extensions → TracePen (or the TracePen toolbar button). Signed out, the dialog opens on a card titled Sign in to Tracepen: press Sign in with 3dshouse, finish in the browser tab that opens, then come back to SketchUp.
- Choose the image with the file field, or drop it on the preview. Until your first finished trace a Try a sample strip offers ready-made images. Crop keeps only the part you need.
- Wait for Analyzing…: Tracepen counts the colours it finds and sets the Color number slider to that count. The slider can only go down from there (minimum 1).
- Adjust Color number, Noise filter (Off, 1-5), Merge min area (1-64 px) and Corner smooth (0-100%), then press Convert. The defaults are Off, 4 px and 80%.
- Under Color Layers every colour has a swatch you can recolour and a checkbox. Unticked colours are not loaded. The line above the swatches, N faces / M layers, tells you how heavy the model will be before you load it.
- Type the real width of the image in the Width box (millimetres in a metric model, inches in an imperial one) and press Load to SketchUp. The button counts colours as they arrive, for example 2/5.
What lands in your model
- One component named TracePen, placed at the origin: the image’s bottom-left corner sits on the origin, its top edge points toward +Y, everything at Z = 0.
- One group per colour, named Layer 00, Layer 01 and so on. The colour with the largest area comes first, the rest follow by similarity of colour.
- One material per colour, named TracePen_R_G_B with three-digit values (TracePen_255_128_000), painted on both sides of every face.
- Holes stay holes: an outline and its inner outlines become one face (the counter of an O is open), and an island inside a hole gets its own face.
- Straight-edged polygons: every curve is cut into 8 straight segments and the edges are not softened, so a rounder outline means more edges.
- One Undo step by design: the insert is chained into a single SketchUp operation, and SketchUp’s API docs say a transparent operation is appended to the previous one instead of adding an undo step.
Gotchas that come from the source
- A transparent PNG does not give an empty background. Transparency is flattened onto white before tracing (onto black when the image already contains pure-white pixels), and that matte becomes a colour layer. Untick it in Color Layers before loading.
- Tracing the same image again replaces the component’s contents. Placement and scale of the instance survive, but anything you modified inside the component is erased. The image’s identity is its file name plus its pixel size after cropping and resizing, so a cropped or renamed copy loads as a second component instead.
- The Width box starts at 1000. In an imperial model that is 1000 inches, so set it before every load. The unit is read once, when the dialog opens.
- Images are traced at up to 1500 px on the longest side. Larger files are scaled down first, and Width is applied to the cropped, scaled result.
- Very small widths lose detail. Points snap to a 0.025 mm grid, edges shorter than 0.05 mm are dropped and slivers thinner than SketchUp’s 0.0254 mm tolerance are discarded. A 1500 px trace loaded 60 mm wide is 0.04 mm per pixel, so the finest outlines merge.
- Line thickness and Line color only style the preview (and SVG or PDF exports). The faces in SketchUp are built from the filled outlines alone.
- A face SketchUp refuses is skipped without a message. The rest of the colour still loads.
- One colour = dark pixels only. With Color number at 1 the tracer keeps pixels darker than mid-grey as a single silhouette, painted with their average colour.
- Big colours can time out. Each colour is sent as one batch and SketchUp must confirm it within 30 seconds, otherwise the load stops with SketchUp load failed: timeout waiting for layer-faces-ack. Fewer regions per colour (lower Color number, higher Merge min area) means a smaller batch.
- Every Load to SketchUp is one of the day’s free exports. Tracing, previewing and re-tuning are not counted.
When it works well, and where it stops
- It is meant for flat-colour artwork: logos, icons, illustrations. In that mode (the analyser picks it) the image’s exact palette is kept instead of being merged.
- The pipeline has a separate branch for photos, chosen automatically when the image looks like one; there is no switch for it in the SketchUp dialog.
- Output is colour only: no image texture is applied, and no depth is inferred.
- The dialog loads its interface from tracepen.3dshouse.com every time it opens, so it needs an internet connection.
- The image itself stays on your computer. Tracing runs inside the dialog; the only network calls in the code are the sign-in, plan and daily-usage checks, and none of them carries pixels.
Image to SketchUp: Tracepen vs importing, tracing by hand or DXF
- Import the image. According to SketchUp’s help, Use As Image makes an image entity that is “similar to a face”, and Use As Texture paints a face and creates a material. In both cases the picture stays a picture: there are no outline edges to push-pull.
- Trace it by hand. The same guide has a Tracing Images section: pick a drawing tool and draw over the imported image. That suits a few simple shapes; Tracepen produces the outlines, holes and colour groups in one pass.
- DXF. SketchUp lists faces and 3D faces among the CAD entities it imports (a subscriber feature). The web app can export DXF Faces for that route; the plugin skips the file round trip and builds faces directly.
Need a vector file for another program instead? The image to vector tool comparison sets Tracepen next to Illustrator, CorelDRAW and Vector Magic.
Install
Get it on Extension Warehouse →
- In SketchUp open Extensions → Extension Warehouse, search Trace Pen and click Install (SketchUp’s help: “adding most extensions is as easy as clicking Install on an extension’s details page”). The listing is the button above.
- Open it from Extensions → TracePen, sign in with a free 3dshouse account, then trace and load the result. The free plan has a daily limit on loads; Tracepen Pro ($80 one-time) removes it and covers the web app, this plugin and the Blender add-on.
If TracePen is missing from the Extensions menu, open Extension Manager: each extension has an enable toggle on the Home tab, and Settings holds the loading policy, where Identified Extensions Only loads only extensions signed by a registered SketchUp Developer.
Requirements
- SketchUp 2022 or newer, desktop, Windows or macOS. Older versions get a message that points to the web app. Extension Warehouse describes its extensions as developed specifically for SketchUp’s desktop application, so this plugin is not for SketchUp in the browser.
- SketchUp 2026 itself lists Windows 11 and macOS 14 or newer.
- An internet connection and a free 3dshouse account.
FAQ
Is there a free image to SKP converter online?
Tracepen is a free plugin for desktop SketchUp, not a website that hands you a .skp file: the faces are built inside your open model. The Tracepen web app exports SVG, PNG, PDF and three DXF flavours (Lines, Hatch, Faces), not .skp.
How do I trace an image in SketchUp?
By hand: import the picture as an image with File → Import and trace it with SketchUp’s drawing tools, as SketchUp’s own guide describes. Automatically: install Tracepen, open Extensions → TracePen, choose the image, press Convert, then set the Width and press Load to SketchUp.
Can I turn a PNG or JPG into a 3D SketchUp model?
Tracepen turns it into flat faces on the ground plane, one group per colour. Nothing in it estimates depth: you give the shapes height with Push/Pull (or any other SketchUp tool).