To turn a logo into a vector, trace its pixels into closed colour shapes – one flat fill per colour – and save the result as SVG, PDF or DXF. Tracepen does that in your browser: it proposes how many colours the logo has, gives every colour its own layer, and lets you retype any colour to the exact brand value before you download. It is free to use with a free 3dshouse account (a daily allowance of free exports; tracing and previewing are never counted) – trace a logo online, or read the full Tracepen Online page for every control and export format.
Tracepen handles a colour image of any kind, and it is exact on flat-colour graphics such as logos. Two kinds of tool fail a logo in opposite ways. One-colour tracers (the black-and-white cut-off kind) turn a five-colour logo into a single silhouette. AI vectorizers redraw the logo, so the result is not accurate to the source: edges drift and letters can change. Tracepen is neither. Every colour becomes its own layer, and it is deterministic – the same image with the same settings gives the same result – so you can lay the trace over the original and check it.
Why a PNG or JPG logo goes blurry, and what a vector changes
A PNG or JPG stores a fixed grid of coloured pixels. Enlarge it and the software has to invent the pixels in between, so the edges turn soft – that is the blur on a sign proof or a stretched website logo. A vector stores the outline of each shape and its fill colour instead, so it can be drawn at any size from a business card to a billboard with the same sharp edge.
Renaming logo.jpg to logo.svg, or wrapping the JPG in a PDF, does not vectorize anything – the file still holds pixels. Vistaprint’s own guide says the same: the logo has to be traced or redrawn. Vecteezy warns that many online “vector” converters only save a bitmap inside a vector file type, and an Adobe Community poster found an exported SVG looked as poor as the JPG when scaled to 400%.
What a good vector logo needs
“It opens in Illustrator” is not the test. A usable logo vector passes six checks, and each one maps to something you can see or set in Tracepen:
| A good vector logo has… | What goes wrong | Where you fix it in Tracepen |
|---|---|---|
| Exact colours | Colours a shade off the brand value, or a dozen near-identical blues | Click a swatch under Color Layers and enter the brand hex; lower Color number to merge near-duplicates |
| One shape set per colour | A single black silhouette, or hundreds of loose pieces | One layer per colour; the faces / layers count tells you which one you got |
| Clean edges | Wobbly straight lines, rounded corners on lettering | Corner smooth (0% keeps every corner sharp, 100% rounds them) |
| No stray specks | Dots in flat areas, a grey fringe around letters | Merge min area and Noise filter |
| Closed shapes with real holes | Open outlines that a cutter or fill cannot use; “O”, “A”, “R” filled in | Holes are cut with an even-odd fill in SVG and PDF; every DXF Lines contour is written closed |
| No background you did not ask for | A white box behind the logo | Untick the background swatch: it is left out of every format you export |
How to vectorize a logo in Tracepen, step by step
- Start from the biggest, cleanest copy you have. Ask the client or the designer for the original AI, EPS, SVG or PDF first; tracing is the fallback when no original exists. Then use the largest PNG or JPG you can find – the original attachment, not a screenshot of it.
- Open Tracepen and sign in with a free 3dshouse account (the button opens a browser tab; come back when it is done).
- Drop the logo in. PNG, JPG, JPEG, WebP, GIF or BMP, up to 50 MB. It starts tracing by itself. If the picture has a menu bar, a mockup or other clutter around the logo, press Crop first and keep only the logo.
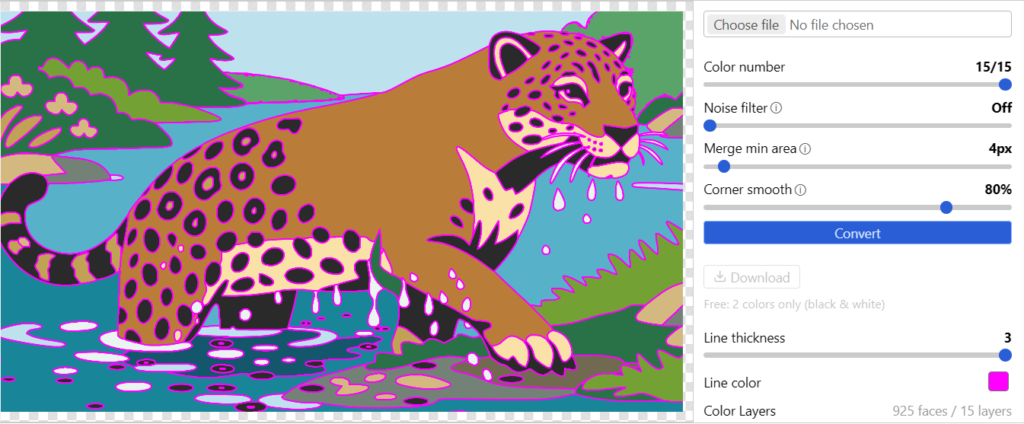
- Count the layers. Under Color Layers you see one swatch per colour and a summary such as “12 faces / 4 layers”. Compare the layer number with what you know: a three-colour logo on a white page should come out as about four layers (three colours plus the background). Many more than that usually means halos or noise, not extra colours.
- Tune and press Convert. Color number starts at the number of colours Tracepen found and can only go down: slide it to the number you know the logo has. Raise Merge min area to absorb specks; use Noise filter only for a compressed JPG; set Corner smooth low for lettering and sharp-cornered shapes. Convert is never counted, so re-run it as often as you like.
- Untick the background swatch if the logo should sit on transparent or on a coloured sheet.
- Set the brand colours. Click each swatch; in most browsers the colour picker takes a hex value, so you can type the exact brand colour. The SVG and the PDF carry exactly the colour on the swatch, and each DXF layer carries it as a true-colour attribute.
- Press Download and pick SVG, PDF, PNG or a DXF type (see the destinations below). Each download counts as one export against the free daily allowance, so do the checking in the next section before you press it.
A transparent PNG is put on a solid backdrop before tracing: white, or black when the logo itself contains pure white. So a white logo on a transparent background shows up as a white layer on a black one – untick the black layer and the white shapes are what you keep. A picture whose longer side passes 1500 px is scaled down first, which is plenty for a logo; the SVG and PDF scale up from there without loss.
Starting settings by kind of logo
| Source | Color number | Noise filter | Merge min area | Corner smooth |
|---|---|---|---|---|
| Clean PNG, flat colours | Leave at the suggestion, or the exact count you know | Off | Default (4 px) | Low for lettering, default for rounded marks |
| Compressed JPG, fringe around letters | Down to the real count | Try 1, then higher | Raise until the specks go | As above |
| Small or low-resolution source | Down to the real count | Off to start | Raise a little: a coarse source has coarse specks | Higher, to even out the stair-steps |
| One-colour mark for a stamp or stencil | 1: the dark parts of the picture come out as a single shape | Off | Default | As the artwork needs |
These are starting points, not a recipe: Convert is free to repeat, so change one slider at a time and watch the preview.
Check the vector before you send it
- Zoom in. The preview zooms with the mouse wheel. Look at the round letters, the thinnest stroke and every place two colours touch.
- Lay it over the original. Download the SVG, place both files in Illustrator, Inkscape or Figma, and lower the top one to about half opacity – an Illustrator tutorial uses the same trick for manual tracing (lower the opacity to check alignment). Because Tracepen traces rather than redraws, the shapes follow your source; a visible gap is usually the blur of the source or the Corner smooth setting, not an invented shape.
- Check the swatches against the brand sheet, one by one.
- Look for holes. Counters of “A”, “O”, “R”, “e” must be see-through when you move the vector over a coloured background.
- Re-run for a second opinion. Same image and same settings always give the same paths, so a trace you tuned today can be reproduced next month for a reprint.
Where the file goes: print, vinyl, laser, embroidery, 3D
| Job | Export | Watch out for |
|---|---|---|
| Print, signage, packaging | PDF (one vector page) or SVG | Colours are written as RGB hex. If the printer wants CMYK or a spot colour, convert in your design app and use the hex as the reference; Vistaprint advises converting a traced logo to CMYK |
| Vinyl and sticker cutting | DXF Lines, or SVG | Every contour is closed; DXF has no stroke, and its units are the pixels of the trace, so set the real size in the cutter software. After upload, check the preview and use SVG when colours matter |
| Laser cutting and engraving | DXF Lines for cut passes, DXF Hatch for filled areas | One DXF layer per colour, so each colour can get its own power and speed. DXF curves are short straight segments |
| Embroidery | SVG or PDF as clean artwork | Tracepen does not write stitch files; open the SVG in your digitizing software if it accepts vector artwork, and let it generate the stitches |
| Web and apps | SVG | One path per colour; PNG is available at 1.5 times the traced size for tools without SVG |
| SketchUp | The Tracepen SketchUp plugin (real faces, one group per colour) or DXF Faces | A logo for a shop-front or a wall sign becomes geometry you can push/pull |
| Blender | The Tracepen Blender add-on | One object per colour, mesh or Bezier curve |
| Figma | The Tracepen Figma plugin | Compare it with the other tracing plugins in Figma image to vector: 11 plugins ranked |
For a CNC router, the DXF Lines outline is where a DXF to G-code workflow starts.
Mistakes that ruin a logo trace
- Tracing a JPEG with its halos. JPEG compression leaves a speckled fringe of in-between colours around letters. If the layer list shows far more swatches than the logo has colours, that fringe is the cause: lower Color number, raise Merge min area, and add a little Noise filter.
- Choosing too many colours. More layers do not mean more accuracy for a flat logo; they split one brand colour into several near-identical ones and make a heavy file. The slider only goes down from what Tracepen found, so pick the real count.
- Tracing a screenshot with the page around it. Crop to the logo, or the trace spends layers on the browser frame.
- Expecting a gradient to stay a gradient. Every layer is a flat fill, so a gradient becomes steps of flat colour. For a true gradient, rebuild that fill in your design app on top of the traced shapes.
- Starting from a tiny favicon. A trace is only as exact as the pixels it is given. If the letters are already unreadable at 100%, no tool recovers them – see the next section.
- Uploading unreleased branding to a random converter. Vistaprint’s guide tells you to read a converter’s privacy policy first. In Tracepen the tracing runs inside the page, so the image itself is not uploaded; the page only talks to 3dshouse.com for sign-in and the export count.
When to redraw the logo by hand instead
Automatic tracing, in any tool, is the right first pass for a flat logo and the wrong one for some others. Redraw by hand when:
- the logo has real gradients, shadows or textures that must stay smooth;
- the source is so small that the letters are guesswork;
- the lettering is a known typeface – identify the font and retype it with the Type tool instead of tracing it, as an Adobe Community answer suggests for a word mark;
- the mark will be edited for years and needs tidy, minimal points.
Even then, a trace is useful as a guide: place it under your pen-tool work and draw over it with the opacity lowered, as in the manual method of the Illustrator tutorial above. If you would rather pay someone, services such as Sticker Mule Redraw return a proof within a few hours and allow free changes to it before you approve.
How the usual routes compare for a logo
| Route | What it does with colours | Catch for a logo |
|---|---|---|
| Tracepen | Proposes the colour count, one layer per colour, editable swatches | Flat fills only; gradients become steps |
| Illustrator Image Trace | Colour mode plus a number-of-colours setting, tuned per image | An Illustrator tutorial notes that it “isn’t always accurate” on complex images |
| Inkscape Trace Bitmap | Multiple scans: a tutorial used four scans for a three-colour logo | Free desktop app, but you pick the mode and the number of scans for each logo |
| Vectorizer.AI | Detects the palette; the vendor describes an AI that fits whole shapes such as circles and rounded rectangles | Upload and preview are free, the download needs a subscription (its page, 2026-10-28). A shape-fitting AI redraws, so check edges and letters against your source |
| Human redraw (freelancer, Sticker Mule Redraw) | Whatever the designer draws | You wait for a proof and review it |
For the same comparison on a photograph instead of a logo, see the image to vector tool comparison.
FAQ
How do I convert a JPG logo to SVG?
Trace it – renaming the file does not work. In Tracepen, drop the JPG in, check that the layer count matches the number of colours in the logo, lower Color number or raise Merge min area if it does not, then pick SVG under Download. Each colour comes out as one path.
How do I vectorize a transparent PNG logo for a large sign?
Drop the PNG in: it is traced on a solid backdrop, which appears as its own layer. Untick that layer, export SVG or PDF, and scale it to the size of the sign in your design software. The shapes stay sharp at any size; how faithful they are depends on the PNG you started with.
Can a pixelated logo be vectorized automatically, or does it need redrawing?
A flat-colour logo with readable edges usually traces well automatically, and you can check the result by laying it over the original. A logo with gradients, or a source too small to read, is a job for redrawing by hand.
Free: limited to 3 exports a day
Pro: unlimited, guaranteed to work, priority support