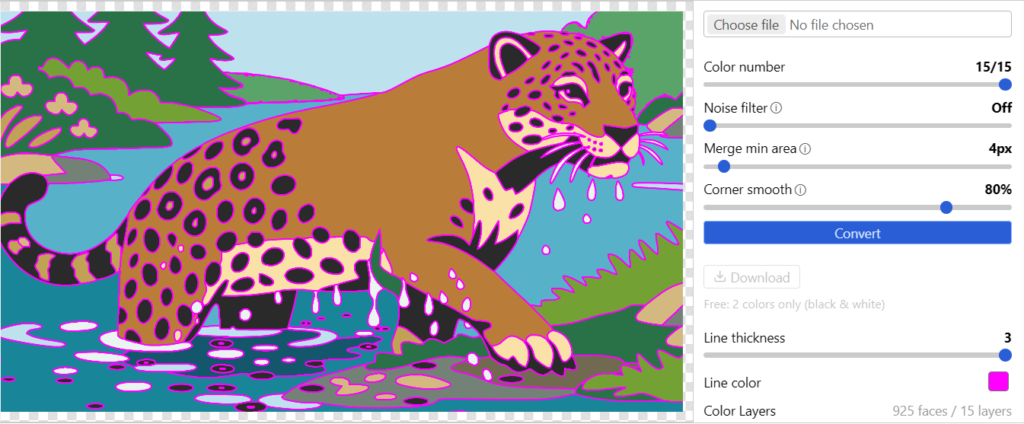
A PNG or JPG becomes a real SVG only when it is traced – the pixels are replaced by filled shapes (paths) – and many “PNG to SVG” converters skip that step and just put the bitmap inside an SVG file. You can tell in 30 seconds: open the .svg in a text editor and look for <image and a long base64 string (wrapped bitmap) or for <path d= lines (traced). Tracepen traces: drop the PNG or JPG into the browser, press Download, pick SVG. It is free to use with a free 3dshouse account (a daily allowance of free exports; tracing and previewing are never counted) – convert a PNG to SVG online, or see the full Tracepen Online page for every control.
Tracepen handles a colour image of any kind, and it is exact on flat-colour graphics such as logos, icons and flat colour areas. It is not a one-colour tracer (the black-and-white cut-off kind turns a multi-colour picture into one silhouette), and it is not an AI vectorizer (those redraw the picture, so the result is not accurate to the source). It is deterministic: the same image with the same settings gives the same SVG, so you can reproduce a file next month.
Two kinds of “PNG to SVG” converter: tracing and wrapping
A PNG or JPG is a grid of coloured pixels. An SVG is text that describes shapes. There are two ways to get from one to the other, and both are sold under the same name:
- Wrapping keeps the pixels. The converter writes an SVG whose only content is an
<image>element pointing at your PNG, usually as base64 text. MDN describes that element as one that “includes images inside SVG documents” and “can display raster image files”. The file has an .svg extension and nothing else about it is vector. - Tracing throws the pixels away and writes the outlines of the colour areas as paths, each with a fill colour. That is the only route to something you can recolour, cut or scale.
What the converters say about themselves, read on their own pages on 2026-10-28:
| Converter | What its page says |
|---|---|
| DevToolLab | Wraps: “This tool embeds your image into an SVG container. It does not trace or vectorize the image.” |
| Poper | Wraps: the image is “embedded as a base64-encoded image element inside the SVG wrapper”. It says the SVG “can be resized to any dimension without pixelation” – the container can, the PNG inside it keeps its pixels |
| Ezgif | Traces: “using image tracing/vectorization”, with adjustable colour count, precision and despeckling |
| CloudConvert | Traces: “Our tracing engine turns pixels into clean, scalable paths”, with presets and a cleanup option |
| Convertio | Describes tracing: “Tracing works best on graphics with distinct edges”, and “Photographs produce complex SVGs with large file sizes” |
| Adobe Express | Does not say how: it only says the result “will look different than a traditional image”; open the file and check |
People hit the wrapped kind all the time. An Adobe Community expert answers a user whose SVG came out bigger than his JPG: “the JPEG gets embedded in the SVG, which of course makes a larger file” (thread). On Doom9 a reply to a user asking about resizing: “Your SVG just has the PNG embedded in it. It hasn’t converted anything” (thread). In a VisualNEO thread the poster discovers that “the file size for svg was very eerily close to size of the base64 encoded data” (thread).
How to tell in 30 seconds: open the SVG in a text editor
Right-click the .svg, open it with Notepad or any text editor (not a browser, which only draws it), and compare:
| Check | Wrapped bitmap | Traced SVG |
|---|---|---|
| What is in the text | One <image ... href="data:image/png;base64,..."> and a wall of letters and digits |
A few <path d="M... C... L... Z" fill="#..."/> lines |
| File size against the source | About a third bigger than the PNG: base64 writes 4 characters for every 3 bytes | Unrelated to the source size – it follows the outlines (see the file size section) |
| Zoom to 800% in a browser | The same square pixels, only bigger | Edges stay sharp |
| Cricut Design Space | Not supported. Cricut’s help: “.svg or .dxf files cannot contain non-vector files for Cricut Design Space image upload” | Accepted as layers, one per colour |
Cricut’s help centre also states what a raw PNG or JPG gets you instead: raster files “are uploaded as a single layer”, not a layer per colour (How to upload images into Design Space). The refusal quoted above is from its unsupported items page.
What a real SVG from Tracepen contains
Open any Tracepen SVG in a text editor and the whole file is this:
- One root
<svg>with aviewBoxand awidth/height, both in the pixels of the traced picture. MDN: with aviewBox, “a transform stretches or resizes the SVG viewport to fit a particular container element” – so the same file can be 16 px in a toolbar or a metre wide on a banner. A picture whose longer side passes 1500 px is scaled down first, and the file is in those pixels. - One
<path>per colour layer, each with a flatfillhex colour. The path text uses straight lines and curves only (M, L, C and Z commands, three decimals). - Holes are real holes. Every path carries
fill-rule="evenodd", so the inside of an “O” or an “8” is see-through, not a white blob on top. - A thin stroke in the fill’s own colour (
stroke-width="1"unless you set a Line thickness). It stops hairline seams between neighbouring colours in viewers that draw each shape on its own. - No
<image>, no text, no gradients, no script. Letters arrive as outlines, not as editable type, and a gradient arrives as steps of flat colour.
A shortened line from a real file (a four-colour logo on white, saved as a JPG, traced on 2026-10-28):
<path d="M189.120 277.500 C 189.597 273.650,191.614 265.424,193.601 259.220 C 195.923 251.974,199.055 244.918,202.358 239.493 ... L 72.000 166.000 Z " fill="#2b9c4a" stroke="#2b9c4a" stroke-width="1" stroke-linejoin="round" fill-rule="evenodd"/>Layers are written largest area first, so the first <path> is usually the background. That matters for file size and for transparency, both below.
Convert a PNG or JPG to SVG in Tracepen, step by step
- Open the app and sign in with a free 3dshouse account (the button opens a browser tab; come back when it is done).
- Drop in the PNG or JPG (WebP, GIF and BMP work too, up to 50 MB and 250 million pixels). It traces by itself. The longer side is scaled to 1500 px if it was bigger.
- Look at Color Layers. One swatch per colour, plus a summary such as “N faces / M layers”. Compare M with the number of colours you know the picture has.
- Tune, then press Convert. Color number starts at the number of colours found and can only go down. Merge min area (1-64 px, default 4) absorbs specks; Noise filter (Off, 1-5) evens out a compressed JPG; Corner smooth (0-100%, default 80%) keeps corners sharp at 0% and rounds them at 100%. Convert is never counted, so re-run it as often as you like.
- Untick the background swatch if the SVG should be transparent or the file should be light (next sections).
- Press Download, pick SVG. The file is named after your picture (
logo.pnggiveslogo.svg). Each download counts as one export against the free daily allowance. - Open the .svg in a text editor once: if you see
<pathlines and no<image, you have what you asked for.
File size: what really drives it (measured)
A traced SVG is not automatically smaller than the PNG, and the colour count is not what makes it big. Two test images, traced with default settings on 2026-10-28 (your numbers will differ, the pattern is the point):
| Test image | Setting | SVG size |
|---|---|---|
| Four-colour logo on white, JPG, 583 x 583 px, about 86 KB (five layers) | Color number 2 | 47 KB |
| Color number 4 | 50 KB | |
| Color number 5 (all found) | 50 KB | |
| Same, background layer unticked | 6 KB | |
| Black lettering, PNG, 4500 x 4500 px, about 364 KB (traced at 1500 x 1500) | Default (Merge min area 4) | 299 KB |
| Merge min area 1 | 992 KB | |
| Merge min area 16 | 262 KB | |
| Merge min area 64 | 262 KB | |
| Default, background layer unticked | 110 KB |
- The background layer was the biggest part of both files. Its outline follows the border of the picture one pixel at a time (the path starts
M 0.000 0.000 L 1.000 0.000 L 2.000 0.000 ...), and that single path was 44 of the 50 KB in the logo and 189 of the 299 KB in the lettering. If you do not need the background, untick it before you download. - Merge min area is the strongest size knob. At 1 px the lettering file more than tripled, because every speck of the source became a shape; from 16 up it stopped shrinking. The clean logo barely changed (51 KB at 1, 50 KB from 4 up).
- Colour count barely moved the size (47 KB at 2 colours, 50 KB at 5). Size follows the number of points along the edges, not the number of colours.
- The N faces counter is the early warning: thousands of faces means a heavy file in Illustrator, Cricut or a browser. Raise Merge min area or lower Color number before you download.
How many colours to ask for
For flat artwork, the number of colours it really has plus one for the background. The count Tracepen proposes is usually that, and you can only go down from it. Going down merges the closest colours: useful to fold two near-identical blues into one, harmful if you collapse two colours that are meant to differ. At 1, the dark parts of the picture come out as a single shape, the quickest route to a one-colour stencil.
The test logo above has slight shading inside each segment; it came back as five flat fills (four colours and the white), which is what a trace of a gradient looks like. If an exact brand colour is the job, follow the steps in logo to vector, where each swatch is retyped to the brand hex. In both test files the background swatch came out a hair off pure white (#fffffe and #fefefe), so if you keep a white background, set the swatch to the colour you want rather than trusting it.
Transparency: the background is a layer
A JPG has no transparency, and a PNG’s transparent pixels are put on a solid backdrop before tracing: white, or black if the picture itself contains pure white. Either way the backdrop becomes a layer you can see in Color Layers. Untick it and it is left out of the SVG, so the file really is transparent. A white logo on a transparent PNG shows up as a white layer on a black one; untick the black layer and the white shapes are what you keep.
Where the SVG goes: Cricut, Silhouette, web, Figma
| Destination | What to know |
|---|---|
| Cricut Design Space | Upload the SVG: Cricut says raster files “are uploaded as a single layer” while vector files “upload as designed” with layers separated by colour (upload guide). It lists pattern fills, gradients and embedded images as unsupported and limits an SVG to 5000 paths. A Tracepen SVG has one <path> element per colour (each holds many outlines, and Cricut does not say which it counts), flat fills and no embedded image. The files also carry the thin same-colour stroke described above; how Design Space treats it has not been checked here, so look at the preview after upload. |
| Silhouette Studio | Silhouette’s own FAQ: “To open SVG files you will need Silhouette Studio Designer Edition or above”. On the Basic edition use a DXF instead – see PNG to DXF, which also covers laser and CNC. |
| A web page | MDN lists the options: an img element, or the SVG “directly embedded in HTML”. The viewBox lets CSS set any size. Remember the file keeps every point: for a big trace, drop the background layer first. |
| Figma | Drag the .svg onto the canvas. Figma’s help: “When an SVG file is imported into Figma, the SVG is no longer treated as an image. Instead, it is converted into an editable vector layer.” The Tracepen Figma plugin skips the file and traces the selected layer on the canvas. |
| Illustrator, Inkscape, Affinity, Canva | Open or place the SVG: each colour is one path you can recolour or edit. |
| Colours are written as RGB hex. Download PDF instead of SVG if the printer asks for a vector PDF; for CMYK, convert in your design app. | |
| A logo that must match a brand sheet | Use logo to vector. |
Mistakes that spoil a PNG to SVG conversion
- Trusting the extension. Renaming logo.png to logo.svg, or “saving as” SVG in a tool that only embeds the picture, produces a file that opens and does nothing a vector does. Run the text-editor test.
- Tracing a grainy JPG with Merge min area at 1. Every speck becomes a shape and the file grows several times over (992 KB against 299 KB in the lettering test). Keep 4 or higher, and add a little Noise filter for compressed JPGs.
- Leaving the background in. It is the heaviest layer and it puts a coloured box behind your shape. Untick it.
- Expecting type to stay type. Letters are outlines after tracing. If you know the font, retype the text in your design app and keep the trace for the symbol only.
- Expecting a gradient to stay smooth. Every layer is one flat colour, so a gradient becomes steps. Rebuild the gradient in your design app on top of the traced shape.
- Starting from a tiny or screenshot-framed picture. A trace is only as exact as the pixels it gets. Crop away the browser frame first (Crop) and use the largest copy you have.
Free ways to convert PNG to SVG, compared
| Route | What it does | Catch |
|---|---|---|
| Tracepen (browser) | Traces a colour image: one path per colour, editable swatches, background optional. The picture itself is not uploaded: tracing runs in your browser | Free account needed; flat fills only |
| Ezgif, CloudConvert, Convertio | Trace (see the table above); options differ by site. Ezgif says uploads are deleted after 1 hour, Convertio says uploaded PNG files are deleted right after processing | You upload the picture to them; Convertio notes photographs give heavy SVGs |
| Inkscape, Trace Bitmap | Free desktop app. Its manual: “Multiple scans” “will create a separate object for each scan”, ten stacked objects in its example | You choose the mode and the number of scans for each picture; stacked objects, not one path per colour region |
| Wrapper converters | Put the PNG inside an SVG file | Not a vector, see the test above |
| AI vectorizers | Redraw the picture as new shapes | The result looks like the source but is not accurate to it; check edges and lettering |
For the same comparison on a photograph, see the image to vector tool comparison.
FAQ
Why is my SVG bigger than the JPG I converted?
Most likely the converter embedded the JPG inside the SVG: base64 text is about a third bigger than the picture it encodes. Open the SVG in a text editor; an <image element with data:image means nothing was traced. A properly traced SVG can also be large if the background layer is kept or specks became shapes: untick the background and raise Merge min area.
Can I resize an SVG to any size without losing quality?
A traced SVG can be scaled freely: it holds outlines and a viewBox, so edges stay sharp at any size, though it is only as detailed as the PNG it was traced from. A “converted” SVG that only wraps the PNG keeps the original pixels and goes blocky when enlarged.
How can I tell if a PNG to SVG converter really vectorized my image?
Open the downloaded .svg in a text editor. <path d= lines with coordinates mean it was traced; one <image element with a long base64 string, and a file about a third bigger than your PNG, means it was only wrapped.
Free: limited to 3 exports a day
Pro: unlimited, guaranteed to work, priority support