Online, Tools, Tracepen
PNG / JPG to DXF for Laser and CNC: Closed Outlines, One Layer per Colour (Free)

A PNG or JPG cannot be “saved as” DXF – it has to be traced. A picture is a grid of coloured pixels; a DXF is a list of geometry (polylines, hatches, faces) that CAD, laser and CNC software can select, measure and cut. So the job has three parts: trace the colour regions into closed outlines, write them to a DXF, and give the result a real size. The quickest free route is Tracepen in the browser: drop the image in, press Download, pick DXF Lines. One catch before you start: the DXF carries no unit – it arrives sized in the picture’s pixels, and you scale it once in your CAD or laser software.
Why a PNG or JPG will not open as DXF
Renaming the file does nothing, because the two formats store different things: pixels versus entities. Insert a PNG into AutoCAD and it stays a picture; Autodesk’s Raster Design help says it plainly – to use the data as geometry, “you should vectorize the entities”, and its vectorization tools “work best on bitonal images”. LightBurn’s own Trace Image tool makes the same point from the laser side: it “works best for content that has very clear edges, like a silhouette or a cartoon” and “does not work very well for photographs”. If your artwork is already a vector PDF, skip tracing altogether and read how to convert a vector PDF to CAD instead.
What a DXF needs before a laser or router will cut it
- Closed outlines. LightBurn’s manual: to Fill a shape, “the shape must be a closed loop, where the starting and ending point are the same”, and its Auto-Join only repairs end points within 0.05 mm of each other. Tracepen’s DXF Lines writes every contour as a closed polyline, so there is nothing to join.
- Holes as outlines of their own. The inside of an “O” is a second closed contour. DXF Lines writes the letter and its hole as separate closed polylines on the same layer; which one is cut first is decided in your laser or CAM software.
- One layer per operation. Tracepen puts each colour on its own DXF layer (named layer_0, layer_1 and so on, with the colour attached), so cut, score and engrave can be separate jobs sorted by colour.
- A real size. A PNG has a pixel count and maybe a DPI tag, but no physical size, so any converter has to invent one. Details in the section on scale below.
- No specks. Every stray pixel patch becomes an outline the machine will follow. Merge min area removes them before export.
- Kerf is not in the file. The outline is written exactly as traced; the kerf offset belongs in the laser or CAM software.
PNG or JPG to DXF in Tracepen, step by step
- Open the app and sign in with a free 3dshouse account (the button opens a browser tab; come back when it is done).
- Drop in the PNG or JPG (WebP, GIF and BMP work too, up to 50 MB and 250 million pixels). It traces by itself. A picture whose longer side passes 1500 px is scaled down first, and the DXF coordinates are in that scaled picture’s pixels – a picture 3000 px on its long side arrives 1500 units long, not 3000.
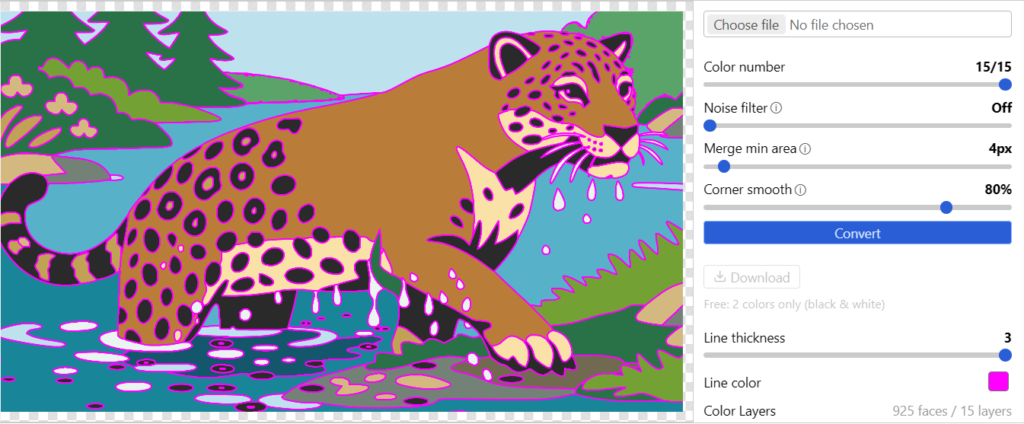
- Read the colour count. Color number starts at the number of colours found. Slide it down to merge near-duplicates into one layer; at 1 the dark parts of the picture come out as a single shape, the quickest way to a stencil or a cut-out.
- Clean the trace, then press Convert. Merge min area (1-64 px) swallows specks into the colour around them; Noise filter evens out a grainy scan or a hard-compressed JPG; Corner smooth low keeps lettering sharp, high suits a hand-drawn line. Converting is never counted, so re-run it as often as you like.
- Untick what you do not want cut. Each colour is a swatch with a checkbox in Color Layers; an unticked layer is left out of every export. The panel also shows “N faces / M layers” – thousands of faces means a heavy file and a slow cut, so raise Merge min area or lower Color number first.
- Download → DXF Lines for cutting, or DXF Hatch for filled areas (next section).
- Set the size in your software (below).
Fix the size once
The file is unitless and its origin is the bottom-left corner of the picture, with Y pointing up. An 800 px wide trace is 800 units wide; read as millimetres, that is an 800 mm logo. Import it, measure one feature you know (the logo’s full width), then scale uniformly by wanted size / measured size: for 80 mm, that is 0.1. If the result is off by exactly 25.4, the software read inches as millimetres or the other way round. Some one-colour online converters ask for the final width in mm before download; Tracepen does not, so this one step is yours.
DXF Lines, DXF Hatch or DXF Faces
| Download option | What the file contains | Use it for | Not for |
|---|---|---|---|
| DXF Lines | Every contour a closed LWPOLYLINE, one layer per colour | Cut paths: Cricut, Silhouette, LightBurn (Cut), CNC profiles, AutoCAD | Filled engraving |
| DXF Hatch | One solid HATCH per colour; nested contours by even-odd, so holes stay holes | Filled areas: LightBurn (Fill / Scan), AutoCAD | Cut lines |
| DXF Faces | Triangulated 3DFACE at Z = 0, one layer per colour | 3D programs such as SketchUp (tick Merge Coplanar Faces on import) | Laser or CNC – triangles have no outline to follow |
- Everything sits inside blocks – one block per colour, inserted at the origin. If your CAD shows a single object instead of separate outlines, explode it once. Autodesk’s EXPLODE help: it “removes one grouping level at a time”, and exploding a polyline again breaks it into separate lines and arcs – which are no longer closed shapes.
- Curves are short straight segments in every DXF, so zoom in on a big circle in CAD and you will see facets. The SVG and PDF exports keep true curves.
- Unticked layers never reach the file, so hiding the background swatch is how you drop the rectangle around a logo.
Mistakes that waste material
- Cutting a photo. A photograph has no outlines to find; tracers from LightBurn to AutoCAD say so in their own docs. Start from flat artwork – a logo, an icon, a sign, a silhouette.
- Forgetting the background. The rectangle around a logo is one more layer. Untick it before you export, or the cutter will cut the box too.
- A transparent PNG gets a background. Transparent pixels are filled with a solid colour before tracing – black when the picture contains pure white, white otherwise – so a white-lettered logo on a transparent background turns up on black. It lands as a layer you can untick.
- A JPG with fuzzy edges. JPEG compression leaves distortion around every edge, and Scan2CAD’s JPG guide spells out the consequence: vectorize without cleaning and “you would create vectors for the distortion”. Use Noise filter and Merge min area. Re-saving the JPG as a PNG does not remove the fuzz – only an original lossless file does (the same guide says a JPG saved as TIFF is no better).
- Stencil letters with no bridges. The islands inside O, A, B, 8 or 0 fall out when the outline is cut. One online converter’s page warns that islands and details narrower than about twice the kerf burn away. A tracer cannot add bridges; the design needs them.
- Trusting the scale. Measure after import, every time, as above.
Which tool for which image
| Route | Good for | Watch out for |
|---|---|---|
| Tracepen (browser) | Colour images and flat-colour artwork (logos, icons, signs): one closed-outline layer per colour; Lines, Hatch or Faces | No size field – scale after import |
| Inkscape: Trace Bitmap, then Save as DXF (free desktop) | Dark shapes on a bright background; DXF R12 or R14 export | Set units and size yourself; DXF scaling bugs have been reported in its tracker (one, issue 388, is marked fixed) |
| LightBurn Trace Image (Alt+T) | Tracing inside the laser software: silhouettes, cartoons | Works on brightness; its docs say photographs do not trace well |
| One-colour online converters | Black-on-white shapes, with a width in mm typed before download (for example wavespeed.ai: DXF R12, one CUT layer) | Dark or light areas only – its FAQ says photos must be simplified to two tones first |
| Scan2CAD and similar | Scanned technical drawings: lines, arcs, text recognition | Built for a different job than artwork; Tracepen is aimed at artwork (logos, icons, signs), not scanned engineering drawings |
| OpenCV and a DXF library | Programmers who want a script (a reply in a Microsoft Tech Community thread) | You write and maintain it |
For the same photo run through Illustrator, CorelDRAW, Vector Magic and Tracepen side by side, see the image to vector tool comparison.
Why a colour logo comes out differently here
A one-colour tracer sorts the picture into dark and light and traces that single shape, so a five-colour logo becomes one silhouette. An AI vectorizer goes the other way: it redraws the picture, which gives a new image that only resembles yours – fine for looks, wrong for a cut file that must match the source. Tracepen handles a colour image of any kind and is exact on flat-colour graphics: the colours of a logo come back as its own colours, one layer each, and it is deterministic – the same image with the same settings gives the same DXF next month, which matters when a job has to be cut again.
Hand-off to your software
- LightBurn – DXF Lines for Cut layers, DXF Hatch for Fill / Scan. If it still warns about open shapes on a Fill layer, its Edit → Select open shapes set to fill finds them.
- AutoCAD, Fusion 360, LibreCAD – open the DXF, explode the block once if needed, scale to size.
- CNC router – DXF Lines into your CAM program; the outlines are flat at Z = 0, which is where a DXF to G-code workflow starts. Scale first, because the file holds pixels.
- Ready-made patterns instead of tracing – for decorative panels there are 30 parametric laser and CNC cut panels for SketchUp.
Is it free, and where does the picture go?
Tracepen is free to use: a free 3dshouse account, every feature, every colour and every format, with a daily free allowance of exports (converting and previewing are not counted). The tracing runs in your browser, so the picture itself is not uploaded; the page still needs an internet connection to open and to sign in. The full list of controls is on the Tracepen Online page.
FAQ
How do I convert PNG to DXF for AutoCAD?
AutoCAD keeps a PNG as a picture, so trace it first. Open Tracepen, sign in with a free 3dshouse account, drop in the PNG, press Download and pick DXF Lines, then open the .dxf in AutoCAD, explode the block once if you see a single object, and scale to size.
Can I use the DXF for laser cutting?
Yes, if the outlines are closed and the size is right. DXF Lines writes every contour as a closed polyline, one layer per colour. Set the real width in your laser software, add the kerf offset there, and check that thin parts and islands survive the cut.
Why does my DXF import at the wrong size or with no units?
A PNG holds pixels, not a physical size, and the Tracepen DXF is unitless: its coordinates are the pixels of the traced picture (long side at most 1500). Measure one known feature after import and scale by wanted size divided by measured size. A factor of exactly 25.4 means inches were read as millimetres, or the reverse.
Free: limited to 3 exports a day
Pro: unlimited, guaranteed to work, priority support