
 Tiếng Việt
SketchUp
How to draw full option Wardrobe fast in Sketchup 10 minutes

Jun
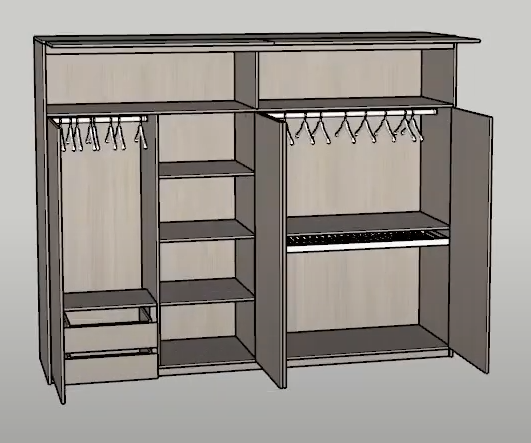
Draw a full Wardrobe (full option) fast and accurately in Sketchup in 10 minutes
Drawing a wardrobe full of accessories in sketchup is difficult and time consuming, but with the 3dhouse plugin you only need 10 minutes to do it.
This guide is current for SketchUp 2026, which is now an Autodesk product sold only as a named-user subscription (perpetual licenses ended in 2020). Everything below still works the same way it did in 2022–2025, because the wardrobe parts are built from standard Dynamic Components, which Autodesk continues to support in 2026.
User manual
-
- You need to install the free plugin: 3dshouse dynamic sketchup
- Load models directly from the plugin. The plugin has Vietnamese language. You go to Settings to set the language
Video tutorials
https://www.youtube.com/watch?v=D_XbN8c12nc&t=27s
Step 1: Set model parameters
Use 3dhuose plugin to load components, edit parameters accordingly
- Choose a wardrobe – then choose a vertical cabinet Adjust cabinet size to suit actual needs
- Select the yin and yang mount bracket for the cabinet Select drawer for cabinet
- Select the drawer frame for the cabinet
- Select top door for cabinet
- Select drawers for drawer frames in cabinets with continuous handles
- Choose plate
- Choose a clothes rack
- Select mount accessories
- Select the door for the main cabinet
- Select interact dynamic component to open and close motion components
- Select all models press the clean dynamic button
Always resize the cabinet by typing values into the plugin’s option panel, not by dragging it with the Scale tool. A dynamic wardrobe re-builds its internal parts (shelves, drawer counts, panel thickness) from the typed dimensions; the Scale tool instead stretches the whole assembly as one block, so panels end up the wrong thickness and drawers distort — a distortion ABF will later cut exactly as drawn. A second gotcha to know before you start: copy-pasting a dynamic cabinet and then changing its size makes SketchUp split it into a new unique definition each time, which quietly inflates file size and Outliner clutter on a big wardrobe job. Set each cabinet’s options first, then copy, to keep the model light.

Step 2:Clean dynamic button
Chọn mô hình click công cụ Clean Dynamic của plugin 3dshouse để xóa tính năng dynamic, hàn các tấm lại với nhau. Clean Dynamic là bắt buộc trước khi sửa thủ công.
Clean Dynamic is not optional before nesting — it is what makes the panels machine-ready. A live dynamic component stores its parts as scaled instances of a base definition, so the geometry ABF reads can be the wrong real-world size even when the cabinet looks correct on screen. Clean Dynamic strips the dynamic attributes, bakes every panel to its true dimensions and welds the boards, leaving plain groups that nest and export reliably. If you ever need to hand-edit a board after this step, do it now: once cleaned, the parts no longer rebuild from parameters, so re-sizing means editing geometry directly.
Step 3:Nesting with plugin ABF
Select all models using ABF plugin to export CNC drawings
Note before you nest: ABF runs only on Windows SketchUp, and is supported up to SketchUp 2025 — it does not install on SketchUp 2026 or on Mac. If your shop is on the 2026 line, keep a 2025 install for the ABF/CNC export step, or do the modeling in 2026 and export the cleaned wardrobe to 2025 for nesting. ABF lays out the welded panels onto stock sheets and exports a layered DXF (cut, drill, label layers) that you load into CAM software such as Aspire or Mastercam to assign tool paths.
