
 Tiếng Việt
SketchUp
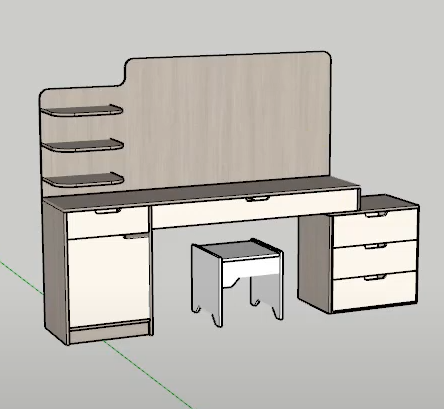
Draw Makeup Table in SketchUp — CNC Export in 10 Minutes

Jun
Drawing a makeup table in SketchUp takes a lot of time and effort. Using the Parashape (3dshouse) plugin you only take 10 minutes to design and export CNC drawings, Its model includes drawers, wings, cabinets, plates
User manual
-
-
- You need to install the free plugin: 3dshouse dynamic sketchup (now called Parashape). It runs on SketchUp 2018 and later, including SketchUp 2026; note that since 2020 SketchUp is named-user subscription only, so sign in with your Trimble ID before loading models.
- Load models directly from the plugin. The plugin has Vietnamese language. You go to Settings to set the language
-
Video tutorials
https://www.youtube.com/watch?v=_C5ZYsdStkI
The drawing components do not need to be in order, but to draw the fastest to limit redundant actions
Step 1: Draw Makeup Table in SketchUp — Load Parametric Model
Select model for your demand , 3dhouse plugin have muilty model
- Choose a dressing table with a fixed mirror
- Adjust the table size to suit actual needs
- Choose a drawer with a handle for the left cabinet
- Choose a cabinet door with a cutout handle for the left cabinet
- Choose a drawer with a cutout handle for the center drawer
- Choose the right cabinet for the dressing table
- Choose a drawer with a handle for the right cabinet
- Choose a corner plate
- Choose a chair
Resize each part along its native scale axis, not the bounding box. A dressing-table dynamic component reads its width/height/depth from defined attributes, so dragging a corner grip with the Scale tool stretches geometry instead of re-deriving panel thickness — open Component Options and type the dimension, otherwise the part exports to CNC at the wrong board size. Keep panel thickness equal to the real sheet stock you will cut (typically 18 mm / 17 mm MDF or plywood); the nesting step in Step 3 trusts that thickness to separate parts onto the correct material layer.

Step 2: Clean dynamic button
Select all model clean dynamic button
This step is not optional — it is the single most-skipped cause of broken CNC exports. While a part is still a live dynamic component its faces are driven by formulas and can sit as separate, ungrouped sub-components; ABF nesting cannot lay out geometry that is still parametric. Clean Dynamic strips the dynamic attributes and welds the panel faces into solid, exportable groups. Do it only after every dimension is final, because once cleaned the part is “baked” — you can no longer retype a size in Component Options to resize it. Save a separate parametric copy first if you expect to change dimensions later.
Step 3: Nesting with plugin ABF
Nesting with ABF plugin to export SketchUp CNC drawing for the makeup table
ABF is a free SketchUp nesting plugin that arranges the cleaned makeup table panels onto sheet outlines and exports a multi-layer DXF you then open in CAM software such as Aspire, VCarve or Mastercam to assign toolpaths. ABF nesting is strictly flat 2D — it only understands panel-style parts, so it is not suitable for sculpted or 3D-printed geometry; anything curved or non-planar should be flattened or excluded before nesting. ABF officially targets Windows SketchUp 2018 through 2025, so if you are on a brand-new SketchUp 2026 install, confirm the current ABF build supports it before relying on it for production. The exported DXF carries each cut feature on its own layer (outline, drilling, grooving), which is why you must keep your handle cutouts and shelf-pin holes as real geometry rather than textures — a painted-on detail will not appear as a toolpath layer.
