
 Tiếng Việt
SketchUp
Select All Same Objects in SketchUp — Select Instances
Nov
Selecting many identical objects at once is one of those SketchUp workflows that separates fast modelers from slow ones. Whether you are placing dozens of chairs in an office, repeating a window component across a facade, or cleaning up a model by swapping out one component type for another, knowing how to select all instances of a component simultaneously saves you from tedious shift-clicking. SketchUp does not have a single button labeled “Select Similar,” but it provides several overlapping commands — Select Instances, All with same Tag, All with same Material, and the right-click context menu of the Components panel — each with specific scope rules that matter enormously in practice. On top of the native tools, the free plugin Selection Toys by ThomThom extends matching to geometry dimensions, area, and edge length, covering cases the built-in commands miss entirely. This guide explains every method, the exact limits of each, and the non-obvious workflows (like reaching across nested contexts or converting groups before you select) that the official documentation glosses over.

How to Select All Same Objects in SketchUp — Tutorial Video
Key Features
- Select Instances — one click to grab every copy of a component
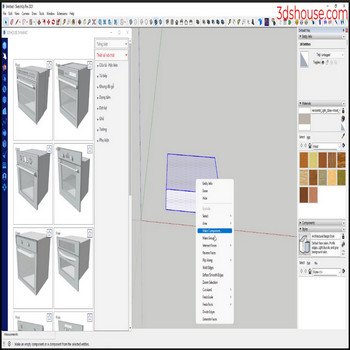
Right-click any component instance and choose Select > All Instances. SketchUp immediately selects every copy of that exact component definition that lives in the same editing context as the one you clicked. This is the fastest path when all your copies are at the top level of the model (not nested inside other groups or components). The selection count appears in the status bar so you can verify the total before doing anything destructive. - All with same Tag — select geometry by tag assignment
Right-click any object and choose Select > All with same Tag. This selects every entity — raw geometry, group, or component — assigned to the same tag, regardless of shape or definition. It is the right tool when you have tagged a category of objects (for example, all furniture on a “Furniture” tag) and need to operate on them together. Note that it crosses component-definition boundaries, so unlike Select Instances it will pick up visually different objects that happen to share a tag. - All with same Material — select by painted face color
Right-click a face or object and choose Select > All with same Material. SketchUp matches every entity that is painted with that exact material. The subtle catch: a face that inherits its material from the parent group is counted as the default material, not as the group’s applied material. If your selections seem incomplete, open the component for editing and check whether faces are painted at the face level or only at the group level. - Components panel right-click — true global selection across all nesting
Open the Components panel (Window > Components), find the definition in the In Model list, right-click it, and choose Select Instances. This version ignores editing context entirely and selects every instance anywhere in the model — including those buried inside other groups or components. This is the one command that genuinely reaches everywhere, something the in-viewport right-click cannot do. - Selection Toys plugin — match by geometry properties
The free plugin Selection Toys (by ThomThom, available on Extension Warehouse) adds commands to select geometry by edge length, face area, number of vertices, bounding-box dimensions, and more. It is indispensable when you need to find all faces above a certain area to apply a material, or all short stray edges below a tolerance to clean up a model. Selection Toys works on raw geometry, not just components, covering the cases the native tag and material selectors miss. - Edit > Select All and filter — broad selection then narrow down
Press Ctrl+A (Cmd+A on Mac) to select everything in the current context, then Shift-click individual items to deselect unwanted ones. Combined with the Tag visibility controls (hiding tags you do not want selected before pressing Ctrl+A), this reverse approach is sometimes faster than trying to build up a selection from scratch when most of the model belongs to one category and only a few items are exceptions.
How to Install and Use
Using the built-in Select commands (no install needed):
- Enter the correct context first. If your component instances are inside a group, double-click to open that group before you right-click. Select Instances only matches within your current editing context — clicking from outside will only ever return one result if the instance itself is nested.
- Click once on any instance of the component. Use the Select tool (keyboard shortcut: Space). A single left-click is enough; you do not need to triple-click or enter the component for editing.
- Right-click and navigate to Select. The submenu shows: All Instances, All with same Tag, All with same Material. Choose All Instances for component matching.
- Verify the count in the status bar. The lower-left corner of the SketchUp window displays how many entities are now selected. Cross-check this against the instance count shown in the Entity Info panel (Window > Entity Info) when a single instance was selected — the numbers should match if every copy is in the same context.
- For global selection across all nesting, open Window > Components, click the house icon to see In Model components, right-click the definition name, and choose Select Instances. All instances in the entire model are selected regardless of where they live.
- Proceed with your operation. With all instances selected you can: delete them all at once, move them to a different tag via Entity Info, apply a material, scale them uniformly, or replace them using Edit > Copy then a plugin like Component Replacer.
Installing and using Selection Toys (for geometry-based matching):
- Open Extension Warehouse inside SketchUp (Window > Extension Warehouse) and search for Selection Toys by ThomThom.
- Click Install and accept the prompt. SketchUp will load the plugin immediately without restarting.
- After installation, Selection Toys commands appear under Extensions > Selection Toys in the menu bar. There is no separate toolbar by default, but you can add one via View > Toolbars.
- To select all faces with the same area as a chosen face: select one face, then go to Extensions > Selection Toys > Select by Same Area. Adjust the tolerance slider in the dialog that appears.
- To expand an existing selection to include all edges of the same length: make an initial selection, then use Extensions > Selection Toys > Extend Selection > Same Edge Length.
- Selection Toys operates on the current editing context just like native tools, so enter any group or component before running it if you want to match geometry inside.
Pro Tips
- Convert lookalike groups to a single component definition before selecting. If you duplicated geometry using Copy+Paste instead of making a component, each copy is an independent group with no shared definition. Select Instances will only find one. The fix: select all copies, right-click one, choose Make Component — but this creates separate components per group unless you first explode them and re-make a single component. The cleanest workflow is to right-click the original geometry and choose Make Component before you start copying, so all copies share one definition from the start.
- Use the Components panel count as a sanity check before bulk operations. After selecting all instances with the in-viewport right-click, open Window > Entity Info. It will show the count of selected entities. Then open Window > Components > In Model and check the instance count on the definition tooltip (hover over it). If the numbers differ, you have instances nested in other contexts that were not caught — use the Components panel right-click method to get everything.
- Combine Tag visibility with Select All to isolate one category. Hide every tag except the one you want, press Ctrl+A, then restore visibility. Everything in the current context belonging to that tag is selected. This sidesteps the per-instance right-click entirely and is particularly useful when you have mixed component definitions on the same tag that you want to move or delete together.
- Selection Toys’ “Select Instances of Same Definition” extends Select Instances to raw-geometry comparisons. If you have objects that are components but you need to filter by physical size (for example, all windows that are exactly 900 mm wide), use Selection Toys’ bounding-box filter rather than manual inspection. This is especially valuable when a model arrives from another software and component names are generic or inconsistent.
- Right-click from the Outliner to select all instances across nested contexts in one step. Open Window > Outliner, find a component definition row (not an instance row), right-click it, and choose Select. SketchUp selects every occurrence. This is an alternative to the Components panel method and is sometimes faster if you already have the Outliner open to navigate complex hierarchies.
System Requirements
- SketchUp version: Select Instances and the Select submenu have been available since SketchUp 2014. All screenshots and behavior in this article reflect SketchUp 2022 and later.
- Operating system: Windows 10/11 or macOS 11 (Big Sur) and later. Keyboard shortcuts (Ctrl vs Cmd) differ by platform but all menu paths are identical.
- Selection Toys plugin: Requires SketchUp 2017 or later (Ruby API 2.4+). Free, no account required beyond the standard SketchUp Extension Warehouse login.
- No additional download required for the native Select commands — they are part of SketchUp’s core and available in SketchUp Free (web), SketchUp Go, Pro, and Studio.