Tiếng Việt
SketchUp
How to Smooth Edges in SketchUp Free: 3 Ways, One Takes a Single Click
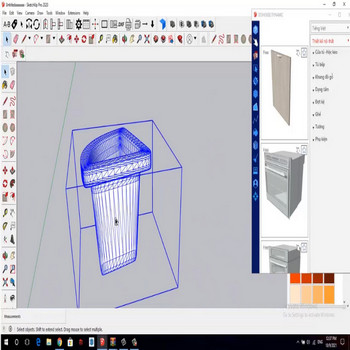
Smoothing and softening edges in SketchUp controls how the surface of your 3D model looks when rendered or exported. Whether you want to hide the facets on a curved surface or reveal construction lines for editing, SketchUp gives you several tools — all available in the free version. This guide covers every method from the native Soften/Smooth dialog to the Eraser shortcut, plus tips for imported meshes.
How to Smooth and Soften Edges in SketchUp — Plugin Video Tutorial
Understanding Soft vs. Smooth
Before reaching for any tool, it helps to know that “soft” and “smooth” are two separate edge properties in SketchUp:
- Soft (Soften): Hides the edge line visually and merges adjacent faces into a single curved surface entity. The edge still exists in the model; it is just hidden. Softened edges respond to the Eraser’s un-soften shortcut.
- Smooth: Changes the shading so the transition between faces looks rounded instead of flat. Without smoothing, two adjacent faces show a hard crease even if the edge is softened. With smoothing, the renderer blends the normals so the surface looks continuous.
In practice, SketchUp always toggles both properties together. You almost never want one without the other. A 10,000-edge sphere stays a 10,000-edge sphere after softening — the geometry is never simplified; softening is purely visual. It also never rounds the corner itself: the silhouette stays sharp, and so does the edge in a section view, in a CNC cut or in a 3D print. For an edge that is physically rounded you need real bevel geometry instead — BevelUp fillets or chamfers the selected edges into real geometry in one click and keeps the materials.
Method 1: Soften/Smooth Edges Dialog
The Soften/Smooth panel is the primary way to smooth an entire object by angle threshold. It is available in both SketchUp Pro and SketchUp Free (desktop).
- Select the object (triple-click to select all connected geometry, or click a group/component).
- Open the panel: Window > Soften Edges (older versions) or View > Panels > Soften/Smooth Edges.
- The Angle between normals slider sets the threshold. Any edge where the two adjacent faces meet at an angle smaller than this value gets softened and smoothed. The default is 20°.
- Drag the slider to the right to smooth more edges (higher threshold). For organic shapes like furniture cushions or car bodies, 45°–60° is common. For hard-surface models with deliberate creases, keep it low.
- Check Smooth normals to apply shading smoothing alongside softening.
- Check Soften coplanar to permanently merge edges that lie between two flat, in-plane faces. Use with care: this operation permanently deletes those edges and cannot be selectively undone — it is great for cleaning up imported CAD meshes but will destroy edges you intended to keep.
Method 2: Eraser Tool + Ctrl (Fastest for a Few Edges)
When you only need to soften a handful of edges, the keyboard shortcut is faster than opening any panel:
- Activate the Eraser tool (press E).
- Hold Ctrl and drag over edges — instead of deleting them, this softens and smooths them.
- To un-soften edges, hold Ctrl + Shift and drag the Eraser over them.
- This works on any visible edge, including edges inside groups if you have entered the group with a double-click.
This shortcut is also the only smoothing method available in SketchUp Free (browser version) — the Soften/Smooth dialog does not appear in the web app.
Method 3: Smoothing Imported Meshes
Meshes imported from CAD or 3D scanning software often arrive as dense triangulated geometry with every edge hard-creased. The Soften/Smooth dialog is the right tool here:
- Select all geometry of the imported mesh (triple-click to select connected faces).
- Open Soften/Smooth Edges and start at around 30°. Increase the angle until curved surfaces look smooth but flat faces retain their hard edges.
- If the mesh has flat regions that were triangulated during export (common with OBJ/FBX files), check Soften coplanar to clean up those diagonal lines. This will merge coplanar triangles into clean quads or polygons.
- For very dense meshes (100k+ faces), select only the curved sections before opening the dialog — applying the threshold to the entire mesh at once can be slow and may over-smooth areas you want to stay hard.
After softening a mesh, press K (Back Edges mode) to see hidden edges as dashed lines through the surface and verify the underlying geometry is still correct. For true see-through shading, use View > Face Style > X-Ray, which has no default shortcut. Softened edges disappear in the normal view, so Back Edges helps you confirm the structure.
Method 4: Auto Smooth Plugin (Batch Processing)
The video above shows an auto-smooth extension that processes multiple objects simultaneously — useful when you have dozens of components to smooth at once and the native dialog would require selecting and applying to each one individually.
To install extensions: go to Extensions > Extension Warehouse, search “auto smooth” or “soft smooth”, and install the one that matches your SketchUp version. Extensions require the desktop app; they are not available in SketchUp Free (browser).
Once installed, select all objects and run the extension command — it applies the same angle-threshold logic as the native dialog but batches the operation across every selected group or component in one click.
Free vs. Pro — What Is Available Without a Subscription
- SketchUp Free (browser, app.sketchup.com): Only the Eraser + Ctrl shortcut is available for smoothing. No Soften/Smooth panel, no extensions.
- SketchUp Go / Pro (desktop): Full Soften/Smooth dialog + angle slider + Soften coplanar, plus Eraser shortcut and extension support.
SketchUp has been subscription-only since 2020 — there is no longer a free perpetual desktop license. The browser version (SketchUp Free) comes with every account at no cost and includes the Eraser soft/smooth shortcut, which covers most casual use cases.
How Softening Works Under the Hood
Behind the scenes, “smooth” and “soften” are two separate edge flags stored per-edge in the SketchUp model. Softening hides the edge and merges adjacent faces into a single curved surface entity, while smoothing only changes the shading so the surface looks rounded instead of faceted. Because softened edges still exist in the model, your geometry is never simplified — a 10,000-edge sphere stays a 10,000-edge sphere even when it looks perfectly smooth.
A non-obvious gotcha in the native dialog: the “Soften coplanar” checkbox permanently deletes edges between flat in-plane faces, merging them silently. This is excellent for cleaning up imported meshes but will destroy edges you may have wanted to keep. The only undo is Ctrl+Z immediately after.
The angle slider (20° by default) only softens edges where the two adjacent faces meet below that threshold. Cranking it toward 90° can flatten the look of an entire model in one click — useful for previewing the smoothed result before committing.

Common Issues
Soften/Smooth panel doesn’t appear in the menu: You may be on SketchUp Free (browser). Use Eraser + Ctrl instead, or switch to the desktop app.
Smoothed object still looks faceted after export: Some renderers and export formats ignore SketchUp’s smooth flag. In that case, set the angle threshold to match the renderer’s own smoothing settings, or use a dedicated normal-smoothing pass in the destination software.
Curved surface looks smooth but flat faces look shaded weirdly: The angle threshold is too high and has smoothed across edges that should stay hard. Reduce the angle slider until only the curved areas are affected.
Eraser deletes edges instead of softening them: Make sure you are holding Ctrl while dragging. Without Ctrl, the Eraser deletes. You will see a small “S” indicator near the cursor when Ctrl is held correctly.
After smoothing, the edge still appears in render: The edge may have been softened but not smoothed (or vice versa). Select the edge, right-click > Entity Info to check both the Soft and Smooth checkboxes.