A herringbone floor material in Revit is three things set on one material: a herringbone model fill pattern as the surface pattern, a texture image that repeats at the same distance, and a cut pattern for sections. Revit does the whole job with its own tools; the slow parts are getting the herringbone pattern file and making a texture whose repeat matches it. This page gives the steps in Revit first, then one short section on a faster route with our add-in Motif.
What goes on the material
Autodesk’s help: fill patterns define “the surface patterns and cut patterns for the graphic representation of elements in the model”, and to change how the material looks in rendered images you change its render appearance. So the floor needs both: the pattern on the Graphics tab for the non-rendered views, and the texture on the Appearance tab for Realistic views and renders.
Step 1: get a herringbone pattern file (.pat)
Revit’s own basic fill pattern dialog only builds “a series of parallel or orthogonal lines” (parallel lines or crosshatch), so a herringbone needs a custom pattern file. Three sources:
- Revit’s own file. An Autodesk Community reply (2025) says Revit.PAT holds a herringbone and quotes it, ready to copy, rename and edit:
*HerringBone 2x6, brick herringbone
;%TYPE=MODEL
45, 0, 0, 2, 2, 6, -2
135, 1.414, 1.414, 2, -2, 6, -2
This is a forum quote, not Autodesk documentation: compare it with the file in your installation (Autodesk’s help places revit.pat and revit metric.pat in the Revit Data folder).
- An online .pat editor. In Autodesk Community threads (2021, 2025) the vendor of one says its simple herringbone template is free; in 2021 it adds that both boards must be the same length.
- A hatch file from our library. Hatchy saves a library pattern as a .pat file, and its software select lists “Revit, model pattern” and “Revit, drafting pattern”. We have not yet loaded Hatchy files into a real Revit, so test one before relying on it (how Hatchy works).
Two tile lengths in one herringbone (for example 1200 x 300 mm and 600 x 300 mm) is a harder case: in a 2021 thread the vendor of a web .pat editor said it had no pre-defined template for it.
Step 2: load it as a model fill pattern
Autodesk’s steps (Revit 2025 help):
- Click Manage > Settings > Additional Settings > Fill Patterns.
- In the Fill Patterns dialog, under Pattern Type, select Model.
- Click New. In the New Pattern dialog set Type to Custom, click Browse, pick the .pat file and click Open.
- Select the herringbone pattern in the list. You can rename it and enter an Import scale.
- Click OK twice.
A fill pattern is stored in the project file where it was created. To have it in future projects, create it in your template, or move it with Transfer Project Standards (Autodesk, About Fill Patterns).
Step 3: set the material’s Graphics tab
- Open the Material Browser, select or duplicate a material and open the Graphics tab.
- Under Surface Pattern, click the Foreground pattern and pick your herringbone pattern in the Fill Patterns dialog; pick a colour for the lines.
- Under Cut Pattern, pick a drafting fill pattern for sections. Tested by the Motif team in Revit 2023: the Cut pattern accepts a drafting fill pattern only, and Revit refused a model pattern with the message “The FillPattern target must be a drafting pattern” (the Surface pattern takes either kind). That matches Autodesk’s video transcript, which says you “will typically use drafting patterns for the cut, and model patterns for the surface”; the sources side by side are in our alignment guide.
Step 4: add a texture with the right Sample Size
On the Appearance tab give the material a colour image of a herringbone. Open it in the Texture Editor and set Sample Size Width and Height to the real size the image covers (Autodesk: “Specify the size that the image represents.”). Autodesk Community advice (2018): use an image that matches the hatch pattern, and a “seamless” texture so the repeat does not show. Revit’s procedural tile is another option the same thread mentions.
Our rule of thumb, not an Autodesk statement: the image must contain a whole number of herringbone repeats, and the Sample Size is that number times the repeat’s real size. The web editor Texturic makes a seamless texture of a library pattern, herringbone included, as an image.
Step 5: align, then check two views
- On the Graphics tab, under Surface Pattern, click Texture Alignment for Foreground and use the arrows until the picture’s joints sit on the pattern lines. The button is inactive for a drafting pattern: “You cannot align a drafting fill pattern.”
- Put the material on a floor and look at it in a Realistic view and in a Hidden Line view. Autodesk Community replies explain why they differ: the Graphics tab drives the non-Realistic views, the Appearance drives Realistic.
- If the lines and the picture are still apart, work through Revit texture not aligning with surface pattern.
For the floor itself, the 2025 thread’s advice is to use a thin floor and apply the surface pattern, not to model each tile.
Tile and brick floors: same steps
A running bond, stack bond or any other tile layout goes through the same five steps; only the pattern file and the texture change. A brick or tile pattern that is too fine can vanish at small view scales: Autodesk calls it pattern overscaling (zoomed far out, a pattern becomes denser and eventually displays as a solid fill).
The faster route: Motif for Revit
This section is about our own add-in (3dshouse makes it). Motif runs inside Revit on Windows. Pick a library pattern (herringbone, running bond, basketweave and more), set the tile sizes, joints and material, press Create Revit material, and it creates the material in the open project (or replaces one of the same name) with a seamless texture on the Appearance tab, a Surface pattern (a model pattern) and a Cut pattern (a drafting pattern), all drawn from the same pattern. Steps 1, 2 and 4 of this page, and the Sample Size you would type, are done for you.
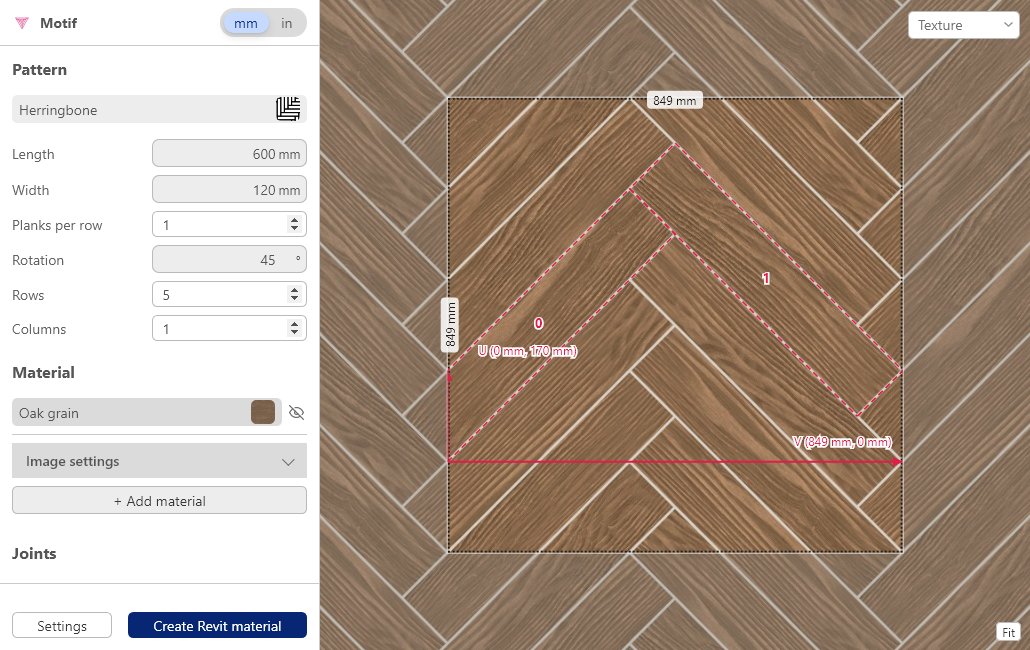
Check the result as in Step 5. Limits: Windows only; built for Revit 2021 to 2026, tested on Revit 2023; the add-in is not digitally signed yet, so Revit shows a “Security – Unsigned Add-In” dialog (choose Always Load); it needs an internet connection; 3 free uses per UTC day with a free 3dshouse account, asked for at the first use; one use is one material created or replaced. More on the Motif page.
Sources (all opened 2026-10-28)
- Autodesk help: Create a Custom Fill Pattern (2025)
- Autodesk help: Create a Basic Fill Pattern
- Autodesk help: About Fill Patterns
- Autodesk help: About Drafting Patterns and Model Patterns
- Autodesk help: Change the Graphics Properties of a Material
- Autodesk help: Align the Render Appearance to the Surface Pattern
- Autodesk help: Texture Editor
- Autodesk help: Video, Create a Fill Pattern (transcript)
- Autodesk Community: Create a herringbone tile pattern with the mass (2025)
- Autodesk Community: Weird custom herringbone pattern (2021)
- Autodesk Community: texture mapping (2018)
- Autodesk Community: Model Patterns (2019)
FAQ
Does Revit have a herringbone pattern?
A forum reply (Autodesk Community, 2025) says a herringbone pattern can be found in the Revit.PAT file, as “HerringBone 2×6”, with the type line ;%TYPE=MODEL, and that you can copy its lines, rename them and edit the numbers (thread). Check the file in your own installation: Autodesk’s help says the default patterns are stored in revit.pat and revit metric.pat under the Revit Data folder (Create a Custom Fill Pattern).
How do I make a herringbone floor in Revit?
A reply in the same thread: for a floor, use a thin floor and apply a surface pattern. Modelling the tiles one by one has “No easy process”; in the thread, a pattern-based curtain panel was ruled out and a “material pattern/image” was called the more practical approach. The steps on this page do exactly that.
Should a herringbone floor be a model pattern or a drafting pattern?
For the surface, a model pattern. Autodesk says a model pattern shows the actual appearance of an element (such as brick coursing or wall tile) and is fixed relative to the model, and the Texture Alignment tool needs a model fill pattern (About Drafting Patterns and Model Patterns, Align the Render Appearance).
How do I change the tile size of a herringbone pattern?
The numbers in the pattern file set it: the forum reply that quotes the 2×6 herringbone says to copy its lines, rename the pattern and edit the numbers to what is needed. When you import a file, Revit also has an optional Import scale field.
Can I make a herringbone with two different tile lengths?
It is harder. In a 2021 Autodesk Community thread a user needed 1200 x 300 mm and 600 x 300 mm tiles; the vendor of a web .pat editor answered that it had no pre-defined template for that case, and a hatch-software vendor posted a two-line pattern in the same thread. A pattern file for it is a custom job.
Why does my herringbone texture not line up with the pattern lines?
The texture and the pattern are two separate things with their own size. See the checklist in our guide Revit texture not aligning with surface pattern.
Free: limited to 3 uses a day
Pro: unlimited, guaranteed to work, priority support