Tiếng Việt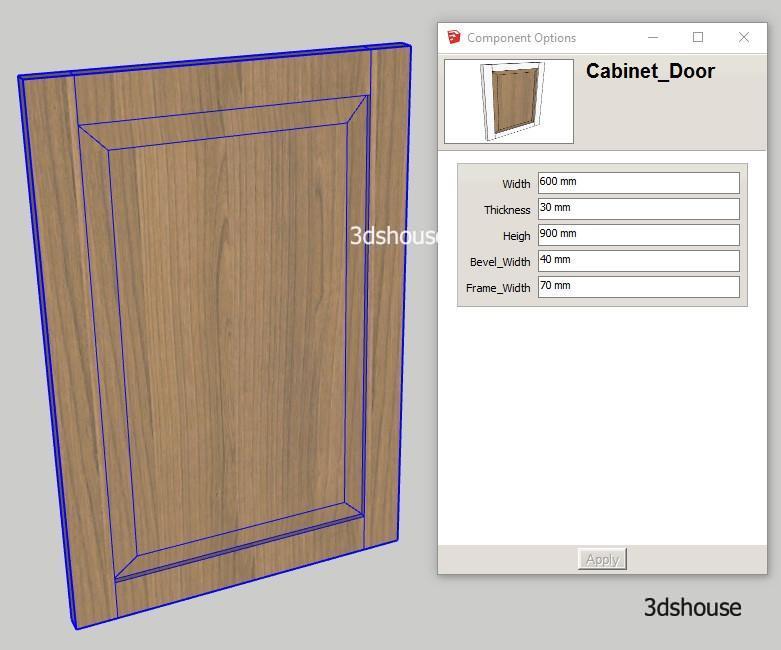
Dynamic Component size constraints of a flat square model are quite easy, but just a model with a chamfer or rounded edges is much harder. With the example of a neoclassical door with a beveled corner, the lesson will show the most optimal way to create a resizable Dynamic Component Resize without changing the ratio.
As of 2026, authoring Dynamic Components is a SketchUp Pro–only feature (named-user subscription) — SketchUp Free / Go can interact with and resize an existing DC, but cannot open Component Attributes to build one, so the techniques below assume Pro. The DC engine itself has not changed in years, which means the file you build here still behaves identically in SketchUp 2026.
Dynamic Raised Panel Cabinet Door SketchUp — Video Lesson
Download Raised Panel Door SketchUp Example Models:
Dynamic-Raised-Panel-Cabinet-Door.skp
Lesson objectives
- Create a Dynamic Beveled Object.
- Proficient setting of Size and Position properties.
- How to divide Models to Child Component
Steps to take
- The most important is to determine how much a Dynamic Con model is divided. For this example, the wooden panel in the middle of the beveled corner requires up to 9 child objects. 4 corners ,4 edges and 1 center.
- Create a beveled panel and put in the model of the Cabinet Door in the previous lesson in the direction of the Video
- The four corners must be set to a fixed LenX/LenY (no formula) so the 45° miter angle is preserved; only the 4 edges and the center receive stretch formulas. If you let a corner scale, its bevel angle skews and the miter no longer meets the neighbouring edge cleanly. This is the whole reason the panel is broken into 9 pieces instead of one.
- Each edge piece needs only ONE growing axis — the top/bottom edges stretch in X (their LenY stays locked to the corner height), the left/right edges stretch in Y (LenX locked). The center is the only child allowed to grow on both axes. Mixing this up is the most common reason a “finished” door distorts the moment you grab the Scale tool.
Note:
- In this lesson, you also learn how to hide edges between border components and corner components. This is a trick to make beautiful models complete.
- Position (X/Y/Z) on the child components, not the Scale tool, is what actually drives the resize — the edges and center are repositioned by formulas referencing the parent’s LenX/LenY, while the corners are pinned to the four parent corners. Resizing the parent only feels “automatic” because every child’s position is solved live from the parent dimensions.
- Soften/hide the seam edges BEFORE making each piece a sub-component, and erase the construction geometry first — hidden edges that live on a shared face between two children will reappear as visible lines after the first scale, because SketchUp re-evaluates face boundaries on redraw. Cleaning the seams up front is what keeps the assembled panel looking like a single solid after stretching.
More SketchUp tools by 3dshouse