Tiếng Việt
With Sketchup Dynamic Components, the first task is to work with Component Attributes. Object properties — understand what attributes of an object you want to manipulate, for example, you want to control the size, or control position, or control rotation, material control … Or you simply want to assign a parameter so all components can share it. This lesson will give you an overview of the properties, and if you do not understand them, it is okay to ignore them. The goal of this lesson is just to remember what the Attributes of a Component are that you want to control. One thing most tutorials skip: authoring Dynamic Components (editing these attributes in the Component Attributes panel) is a SketchUp Pro feature only — SketchUp for Web (Free, Go, or any browser tier) cannot run the Dynamic Components extension at all, so it can neither interact with nor edit a finished Dynamic Component, so this lesson assumes SketchUp Pro 2022 or newer.

How the Component Attributes Panel Works
To open the panel in SketchUp Pro, go to Window > Component Attributes. Select any component in your model and the panel populates with every attribute that component has defined. Click the + button at the bottom to add a new attribute. Each attribute has three parts: a name (what you type in formulas), a value or formula, and an optional label (what shows in Component Options for end users).
Attributes you define become variables. Any attribute on a child component can reference an attribute on its parent by prefixing the parent name: ParentComponent!LenX. This parent-child referencing is the core mechanic that makes dynamic components in SketchUp scale their children automatically when the parent resizes. Without understanding this, formulas will not behave as expected.
- Attribute names are case-sensitive.
lenxandLenXare different. - Built-in reserved names (LenX, PosX, RotX, etc.) connect directly to SketchUp geometry.
- Custom attributes (e.g.,
WallThickness) are user-defined and have no effect unless referenced in a formula.
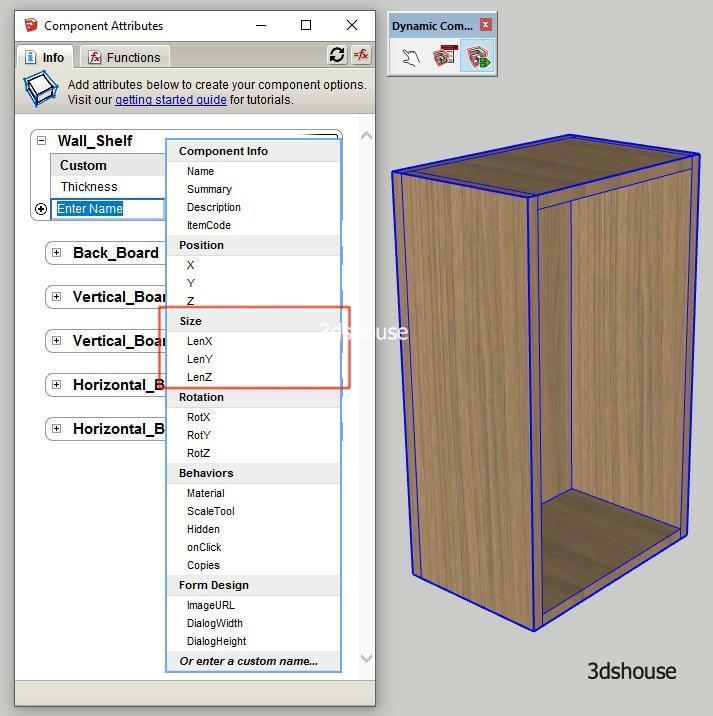
Dynamic Components Size Attributes in SketchUp: LenX, LenY, LenZ Explained
Size Attributes are the most used attributes, used to determine the size of a Component. The actual attribute names you type into formulas are LenX, LenY and LenZ (length in the red, green and blue directions) — not “SizeX/SizeY/SizeZ”. SketchUp only labels them “Size” in the UI, so writing SizeX in a formula will silently fail. You should set these Size Attributes first, and the following properties will be easier.
SketchUp measures LenX, LenY, LenZ in the component’s local axis, not the model axis. If you rotate a component 90° before making it a dynamic component, the local X may point in the world Y direction. Always check the component’s axis orientation with Right-click > Change Axes before writing size formulas.
- LenX — length along the red (local X) axis.
- LenY — length along the green (local Y) axis.
- LenZ — height along the blue (local Z) axis.
To make a child scale with its parent, set the child’s LenX formula to =ParentName!LenX. The child geometry stretches every time you resize the parent. This is the foundation of parametric furniture and cabinet design with SketchUp Dynamic Components.

Position Attributes: PosX, PosY, PosZ
Position Attributes control the X, Y, and Z coordinates of a Dynamic Component inside its parent. This is the second most important attribute after the Size property.
The position is measured in the parent component’s local axis from the parent’s component origin. Setting PosX=0 pins the child’s origin to the parent’s origin along X. A formula like =ParentName!LenX - LenX for PosX keeps the child flush against the parent’s right edge regardless of how the parent is resized — useful for fixed-width panels in a cabinet.
- PosX / PosY / PosZ — position offset from parent origin in parent-local coordinates.
- Combine with LenX/LenY/LenZ formulas to build fully constrained, self-adjusting assemblies.
- If PosX is blank, SketchUp uses the component’s current geometric position and does not reposition it on resize.

Rotation Attributes: RotX, RotY, RotZ
Rotation Attributes (RotX, RotY, RotZ) set the rotation angle of a Dynamic Component — this property is rarely used, sometimes only used when creating a door opening. It also includes 3 dimensions called RotX, RotY, RotZ, each measured in degrees.
The most practical use is animating a door with the Interact tool. Set Onclick (see Behaviors below) to toggle RotZ between 0 and 90. SketchUp will animate the transition when the user clicks the component. Keep in mind rotation pivots around the component’s own origin — position the origin at the hinge point before converting geometry to a component, or the door will swing around the wrong center.
- Values are in degrees.
RotZ=90rotates 90° counter-clockwise around the blue axis. - Negative values rotate clockwise.
- Use
IF()in an Onclick formula to toggle between two states.

Behaviors Attributes
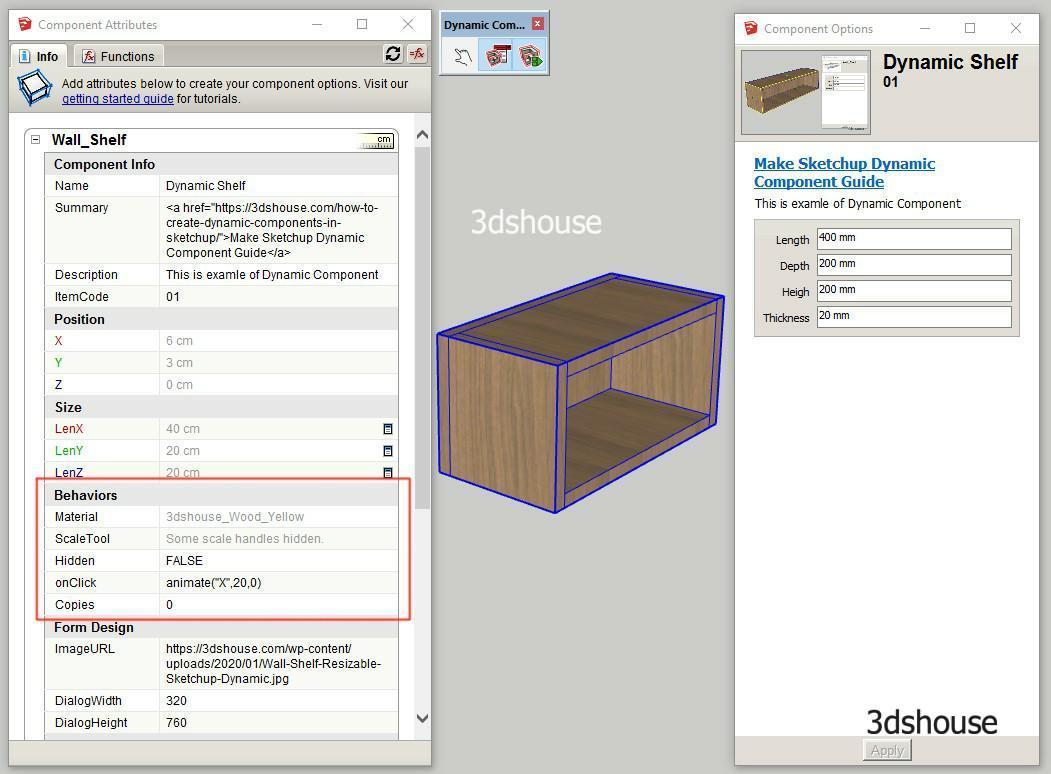
The Behaviors property is heavily used, directly affecting the Components object. 3dshouse will explain each specific attribute below with an example.
- Material: Setting material for Component.
- ScaleTool: Reduce the number of anchor points of the Scale tool (Frequently used)
- Hidden: Hide the Current Component — value 1 hides it, 0 shows it (Commonly Used)
- Onclick: To use the Interact Component Feature
- Copies: Duplicate the Component
A trick most articles miss: alongside “Copies” there is a hidden, read-only variable named “Copy” (singular). Inside a formula it holds the index of each duplicate — 0 for the original, 1 for the first copy, and so on — so a formula like =Copy*30 automatically spaces every duplicate apart and turns a single component into an array (fence posts, stair treads, shelf rows) without any extra geometry.
ScaleTool values reference
ScaleTool accepts a number from 0 to 255. Each bit in that number controls one handle. Common values:
- 0 — no scale handles (lock geometry entirely).
- 4 — scale only in the Z direction (good for a column you want to grow taller but not wider).
- 255 — all handles visible (default SketchUp behavior).
Setting ScaleTool on a parent does not automatically restrict children — each child that should be locked needs its own ScaleTool attribute.

Component Info Attributes
Component Info only shows more information in the Component Options panel, it has no impact on the Component itself, so in short you can ignore this feature. 3dshouse also only uses this feature to place links from Models to web articles. To put in the link, you also need to know a little bit of HTML code.
- Name: The display name of the Component in the Component Options window, if not set, SketchUp automatically takes the current name of the Component.
- Summary: Summary of Component information, can use HTML code, in the example below it uses HTML code to create links to articles on the website.
- Description: Detailed description of the component, can use HTML code.
- ItemCode: Component code, used for component type in large projects.
Security note: because Summary, Description and the ImageURL field below render real HTML in the Component Options dialog, only open Dynamic Components from sources you trust. Keep these fields to plain links and text.


Form Design Attributes
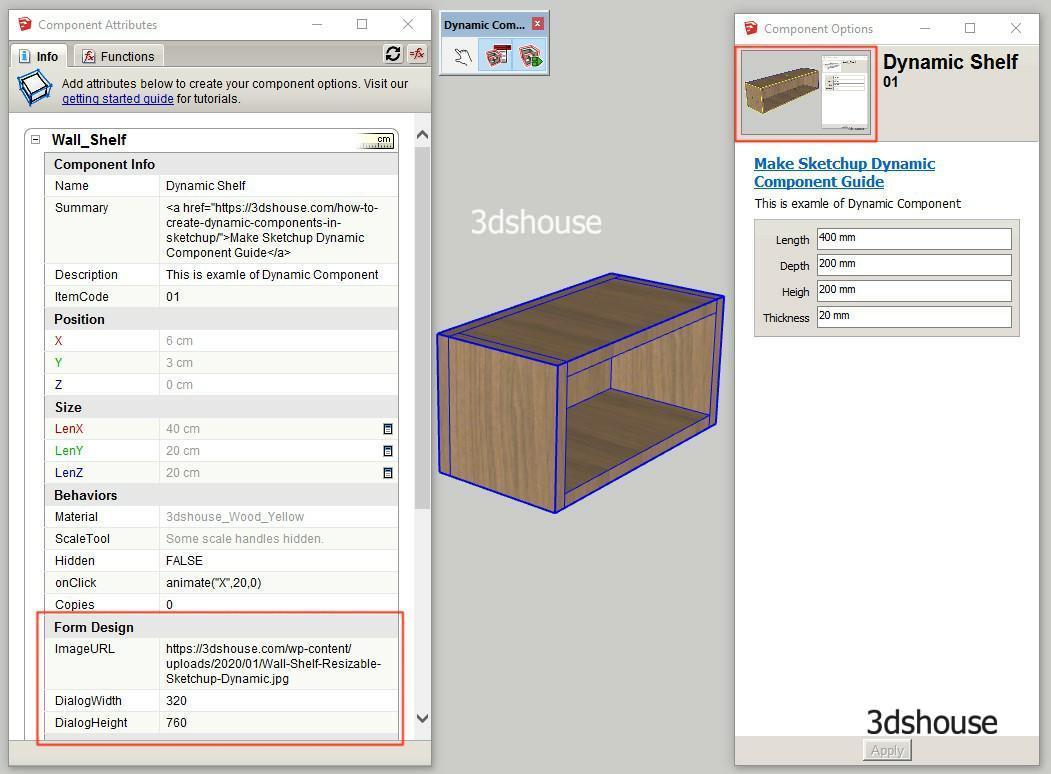
The Design form is just a layout of the Component Options panel, not the Component itself, so you can ignore it; this feature does not help much. 3dshouse experts who use Dynamic Components also do not use the feature because it has no effect on the model, it only looks different.
- ImageURL: Instead of letting the software automatically create a Component Image, we can pull a GIF, JPG or PNG from a website.
- DialogWidth: Width of the Component Options Window.
- DialogHeight: The height of the Component Options Window.

Custom Attributes and Formulas
Beyond the built-in reserved names, you can create custom dynamic components attributes — any name that does not clash with a reserved one. Custom attributes act as variables you define once and reference everywhere.
Common pattern for parametric furniture: define a root-level attribute MaterialThickness = 18 (millimetres) on the parent component, then set every child panel’s LenZ formula to =ParentName!MaterialThickness. Change one number at the top and every panel thickness updates. No need to edit each child individually.
- Formula syntax: start with
=followed by a math expression or function call. - Supported functions:
IF(),AND(),OR(),SQRT(),ABS(),MIN(),MAX(), and more — the full list matches Excel-style functions. - String values (material names, labels) do not start with
=, they are plain text. - Reference a sibling component by name:
SiblingName!LenX. Both components must be inside the same parent.
Expose a custom attribute to end users by enabling its User Visible checkbox in the Component Attributes panel. It then appears as an editable field in Component Options. Give it a descriptive label so non-technical users know what to type.
Using the Interact Tool with Dynamic Components
The Interact tool (the hand cursor icon in the toolbar) triggers the Onclick behavior. Each click cycles through the states you have defined. This requires no extra plugins — it is a native SketchUp Dynamic Component feature available in SketchUp Pro.
To set up a simple door animation:
- Place the component’s origin at the hinge edge.
- In Component Attributes, add an attribute
Open = 0. - Set
Onclickto=IF(Open=0, 1, 0)— this togglesOpenbetween 0 and 1 on each click. - Set
RotZto=IF(Open=1, 90, 0)— 90° when open, 0° when closed.
For more advanced dynamic assemblies pre-built for furniture and architecture, see Parashape — SketchUp Dynamic Component Library.
Common Issues & FAQ