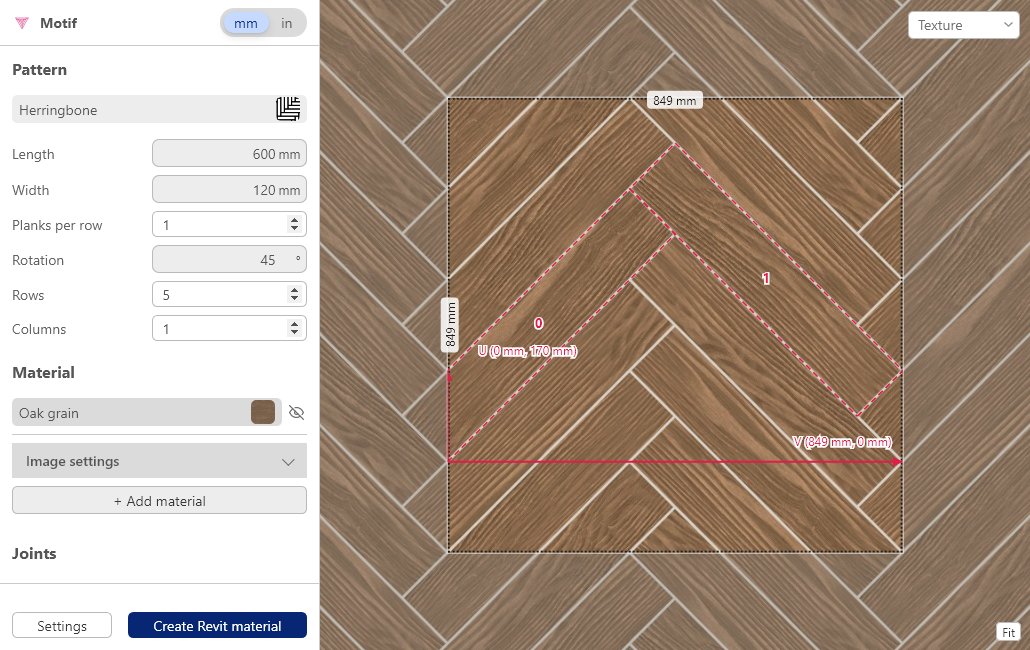
A Revit material is one record that carries five groups of settings: Graphics, Identity, Appearance, Physical and Thermal. To create a new material you open the Material Browser, add a material, name it and fill the tabs you need. The two tabs that decide how it looks are Appearance (the texture, for renders and Realistic views) and Graphics (the Surface and Cut patterns, for drawing views). This page covers creating, editing, storing and sharing a custom material with Revit’s own tools, and then how our add-in Motif creates the whole material from a library pattern in one step.
What a Revit material holds
Autodesk’s help: “Materials control how model elements display in views and rendered images.” A material can hold:
- Graphics: how the material looks in non-rendered views: shading colour, Surface pattern, Cut pattern.
- Identity: description, manufacturer, cost and keynotes.
- Appearance: the look in a Realistic view and in renderings.
- Physical and Thermal: properties for structural and energy analysis (Revit LT does not support these two).
The appearance properties are grouped in one asset of the material and are managed on the Appearance tab.
How to create a new material in Revit
- Click Manage > Settings > Materials to open the Material Browser.
- On the browser toolbar click the new material icon. The material, named Default New Material, is added to the project materials list.
- In the Material Editor panel, just above the Assets list, replace the default name with a descriptive one.
- Enter the information, add assets if necessary, and edit the properties that define the material.
- Click Apply, then OK (the closing steps of Autodesk’s pages for each tab).
Start from an existing material instead
Select the source material (in the project list, or in the library list click Add – Edit on its row, which also adds it to the project), then in the browser toolbar menu choose:
- Duplicate Material and Assets: the new material gets the source name with a digit appended and its own copy of the asset.
- Duplicate Using Shared Assets: the asset is shared. Autodesk’s note: if you edit an asset used by a material, any other material in the model that uses it changes too, so use Duplicate Material and Assets when the copy must look different.
To put a Surface and Cut pattern on a material that already exists in the project, see adding a hatch to an existing material in Revit.
How to edit a material in Revit
Select the material in the project materials list and use the tabs of the Material Editor panel, then Apply and OK. Right-clicking a material in the list gives quick access to renaming. The tab you want depends on the problem:
- Looks wrong in a render or Realistic view: Appearance tab (the texture and its size).
- Looks wrong in a plan, section or Hidden Line view: Graphics tab (colour, Surface pattern, Cut pattern).
- Schedules and tags: Identity tab (description, manufacturer, cost, keynote, mark).
To put a material on the model, Autodesk lists four routes: by category or subcategory, by family type parameters, by an element’s properties, or by face with the Paint tool.
Keep and share your own materials
Autodesk: a material library is a collection of materials and related assets; the libraries it supplies are locked (a lock icon), and a locked library cannot have materials modified, added or deleted. To keep your own materials:
- In the Material Browser, open the toolbar menu and choose Create New Library, name it and pick where to save it.
- Drag materials into it from other libraries or from the project materials list.
- To share it, send the library file (ADSKLIB). The other user loads the library in Revit and adds the materials they want to their project.
The Appearance tab: texture and Sample Size
On the Appearance tab you replace the asset (click Replace, pick an asset in the Asset Browser) or edit its image. For an image, the Texture Editor changes its sample size, position and rotation; set Sample Size Width and Height to the real size the image covers (Autodesk: “Specify the size that the image represents.”). Autodesk also notes that materials do not display in wireframe views.
Surface and Cut patterns: the Graphics tab
Autodesk: the surface and cut patterns affect the graphic representation of the material where it is applied to elements in the model, and they do not affect its appearance in rendered images.
- Open the Graphics tab. Under Surface Pattern set the Foreground pattern and its colour (and, for a model pattern, the alignment).
- Under Cut Pattern set the pattern and colour that draw the cut surface in sections.
- Click Apply, then OK.
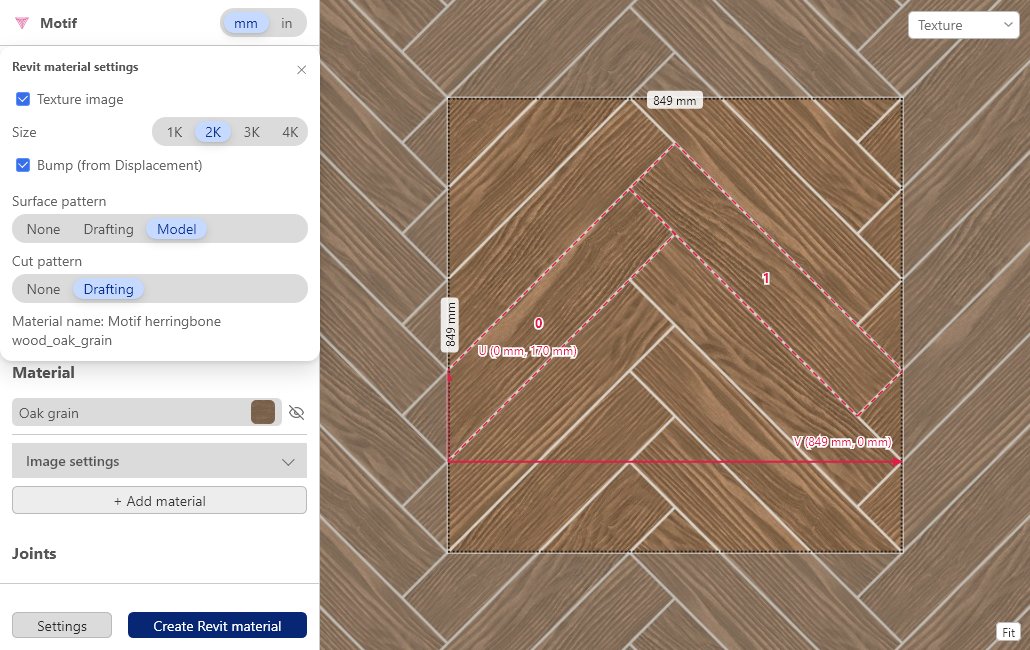
Which fill pattern? Autodesk: drafting patterns represent materials in symbolic form and their density is fixed on the drawing sheet; model patterns represent the actual look (brick coursing, ceramic tile on a wall) and are fixed to the model, so they scale with the view. Autodesk says the Surface Pattern foreground takes a drafting or a model pattern and the background a drafting pattern only. Tested by the Motif team in Revit 2023: the Cut pattern also accepts a drafting fill pattern only, and Revit refused a model pattern there with the message “The FillPattern target must be a drafting pattern”. More on the two kinds, and on where pattern files come from, in Revit fill patterns.
When a pattern does not show
If a pattern is missing, too dense or has turned into a solid fill, the checks by view type, scale and overrides are collected in Revit Cut Pattern Not Showing, Too Dense or Illegible: 9 Checks.
Keeping texture and hatch aligned
The texture (Appearance tab) and the fill patterns (Graphics tab) are separate objects with their own size and starting point, so they can drift apart. Align the texture with Texture Alignment (it needs a model Surface pattern) and set Sample Size to the real size of the image; the five fixes, with Autodesk’s steps, are in Revit texture not aligning with surface pattern.
Create the whole material in one step: Motif
This section is about our own add-in (3dshouse makes it). Motif runs inside Revit on Windows. Pick a pattern from its library, set the sizes, joints and material name, press Create Revit material, and it creates the material in the open project (or replaces one of the same name) with a seamless texture on the Appearance tab, a Surface pattern (a model pattern) and a Cut pattern (a drafting pattern), all drawn from the same pattern. The Sample Size you would type is set for you, and the two patterns match the picture.
- The library has more than 300 patterns. Examples: Stack bond (Length, Width), Running bond (Length, Width, Row offset, Courses per stagger), Herringbone (Length, Width, Planks per row), Hexagon (Side), Basketweave, Chevron, Cobblestone.
- The settings include the texture size (1K to 4K) and a bump option; the material name is yours.
Limits: Motif draws the pattern in the texture and the fill patterns; it does not model objects, and its appearance asset is Revit’s generic one. Windows only; built for Revit 2021 to 2026, tested on Revit 2023; the add-in is not digitally signed yet, so Revit shows a “Security – Unsigned Add-In” dialog (choose Always Load); it needs an internet connection; 3 free uses per UTC day with a free 3dshouse account, asked for at the first use; one use is one material created or replaced. More on the Motif page; other ways to get materials are compared in our comparison of Revit material plugins.
Sources (Autodesk pages opened 2026-10-28 and 2026-11-05)
- Autodesk help: About Materials (2024, opened 2026-11-05)
- Autodesk help: Create a Material (2024, opened 2026-11-05)
- Autodesk help: Apply Materials to Elements (2024, opened 2026-11-05)
- Autodesk help: Change the Identity Data of a Material (2024, opened 2026-11-05)
- Autodesk help: Change the Appearance of a Material (2024, opened 2026-11-05)
- Autodesk help: Change the Graphics Properties of a Material (2024, opened 2026-11-05)
- Autodesk help: About Material Libraries (2024, opened 2026-11-05)
- Autodesk help: Create a Material Library (2024, opened 2026-11-05)
- Autodesk help: Share Materials and Material Libraries (2024, opened 2026-11-05)
- Autodesk help: About Fill Patterns for Material Graphics (2024, opened 2026-11-05)
- Autodesk help: About Drafting Patterns and Model Patterns
- Autodesk help: Align the Render Appearance to the Surface Pattern
- Autodesk help: Texture Editor
- Autodesk help: Apply a Fill Pattern (2025, opened 2026-11-05)
FAQ
How do I create a new material in Revit?
Click Manage > Settings > Materials to open the Material Browser, click the new material icon on the browser toolbar (the material is added to the project materials list as “Default New Material”), type a descriptive name above the Assets list, then add assets and edit the properties; click Apply, then OK (Create a Material). To start from an existing material instead, duplicate it with Duplicate Material and Assets.
How do I edit a material in Revit?
Open the Material Browser, select the material in the project materials list and change the tabs of the Material Editor panel: Identity, Graphics, Appearance and, if you need them, Physical and Thermal (About Materials). Click Apply to save, then OK. If the material shares an asset with another material, editing the asset changes both.
How do I add a texture to a material in Revit?
On the Appearance tab, replace the appearance asset or set the image of the asset you have, then open the image in the Texture Editor and set its Sample Size to the real size the image represents (Change the Appearance of a Material, Texture Editor).
How do I make a custom material library in Revit?
In the Material Browser open the toolbar menu, choose Create New Library, pick a name and a place to save it, then drag materials into it from other libraries or from the project materials list (Create a Material Library). To share it, send the library file (ADSKLIB) to the other users; they load the library in Revit and add the materials they want to their project (Share Materials and Material Libraries).
Why is my surface pattern not showing in Revit?
A rendered image shows the Appearance texture, not the surface pattern, and a pattern zoomed far out turns into a solid fill; the full list of checks is in the nine checks for a Revit cut pattern that does not show.
What is the render appearance of a material in Revit?
It is the asset on the Appearance tab. Autodesk: this information controls how the material displays in the preview and in renderings. The Graphics tab can also use it for shaded views: Revit calculates an average colour for the render appearance and uses it to represent the material in 2D and 3D views (Appearance tab, Graphics tab).
Can I create a Revit material from a pattern instead of by hand?
Yes, with Motif, our add-in: pick a library pattern and it creates the material with the texture, the Surface pattern and the Cut pattern from that one pattern. If you only need the pattern as a hatch file, see Revit fill patterns; for ready-made materials from other makers, see our comparison of Revit material plugins.
Free: limited to 3 uses a day
Pro: unlimited, guaranteed to work, priority support