
 Tiếng Việt
Image to vector
Which image-to-vector tool works best? I tested the top apps.
Apr
Disclosure up front: I’m the author of TracePen, one of the tools in this comparison. I wanted to see honestly where it stands against Illustrator, CorelDRAW, and Vector Magic — so I ran the same photo through all four and I’m posting the outputs here. Judge for yourselves; I’ll flag where mine loses too.
Test methodology
- Input: a single butterfly photo (image 1). I’m only testing photos, not flat graphics / logos. Flat art is easy — every app handles it well, there’s nothing interesting to compare. Photos are where vectorizers get stressed because of the complex gradients and subtle colour transitions.
- Colour count: I picked the highest colour count each app allows, but kept them balanced close to the lowest-capable app so the comparison stays fair. Vector Magic caps out at “Unlimited” (auto), so the other three were pushed up to match as close as possible.
- Stroke colour: all stroke views use cyan for consistency. Vector Magic doesn’t let you change the stroke colour, so I matched the other three to cyan too.
- No post-editing. No manual cleanup, no path merging, nothing. Raw trace output, exported as SVG, rasterised back to PNG at the same resolution.
- What I compared per tool: the filled output, the config panel (so you can see exactly what settings I used), and the cyan stroke view (shows the underlying path structure).
Out of scope
Two whole categories I deliberately left out, because including them would muddy the comparison:
1. AI vectorisers — excluded
Tools like Vectorizer.AI, Vectorizer.io, Adobe Firefly (upscale path), Recraft, Kittl, VectorizeAI, SVG Genie and similar SaaS converters use generative AI to reconstruct what the image should look like, not trace the actual pixels.
That’s fine for a hero image on a landing page. It breaks the moment you need to:
- cut vinyl on a Cricut / Silhouette,
- laser-engrave with Lightburn,
- hand DXF to a CNC or fabricator,
- or print at a shop that will reject any path that doesn’t follow the actual pixels.
If you’re vectorising for production, you want a deterministic tracer — same input → same output, every time. AI is the wrong tool. The tell is dimensional drift: re-run the same photo through an AI vectoriser and edges shift by a pixel or two and small features can appear or vanish, so a measured cut path is never repeatable — fine for art, fatal when the SVG feeds a machine.
2. Black-and-white / 1-bit tracers — excluded
Tools like Potrace, Inkscape Trace Bitmap, AutoTrace, vectorize.eu, online-convert.com, convertio, AutoTracer.org and dozens of similar online converters do monochrome vectorisation — threshold the image to black/white, then trace one outline.
These tools are all roughly equivalent in quality — most are thin wrappers around Potrace anyway. The job is straightforward (one channel, one outline) and there’s nothing interesting to compare between them. They just don’t apply to the colour photo problem this post is about.
So: all four tools in this comparison are deterministic, full-colour tracers. The SVG follows the real pixels, no hallucinated shapes, no monochrome simplification.

Adobe Illustrator — Image Trace

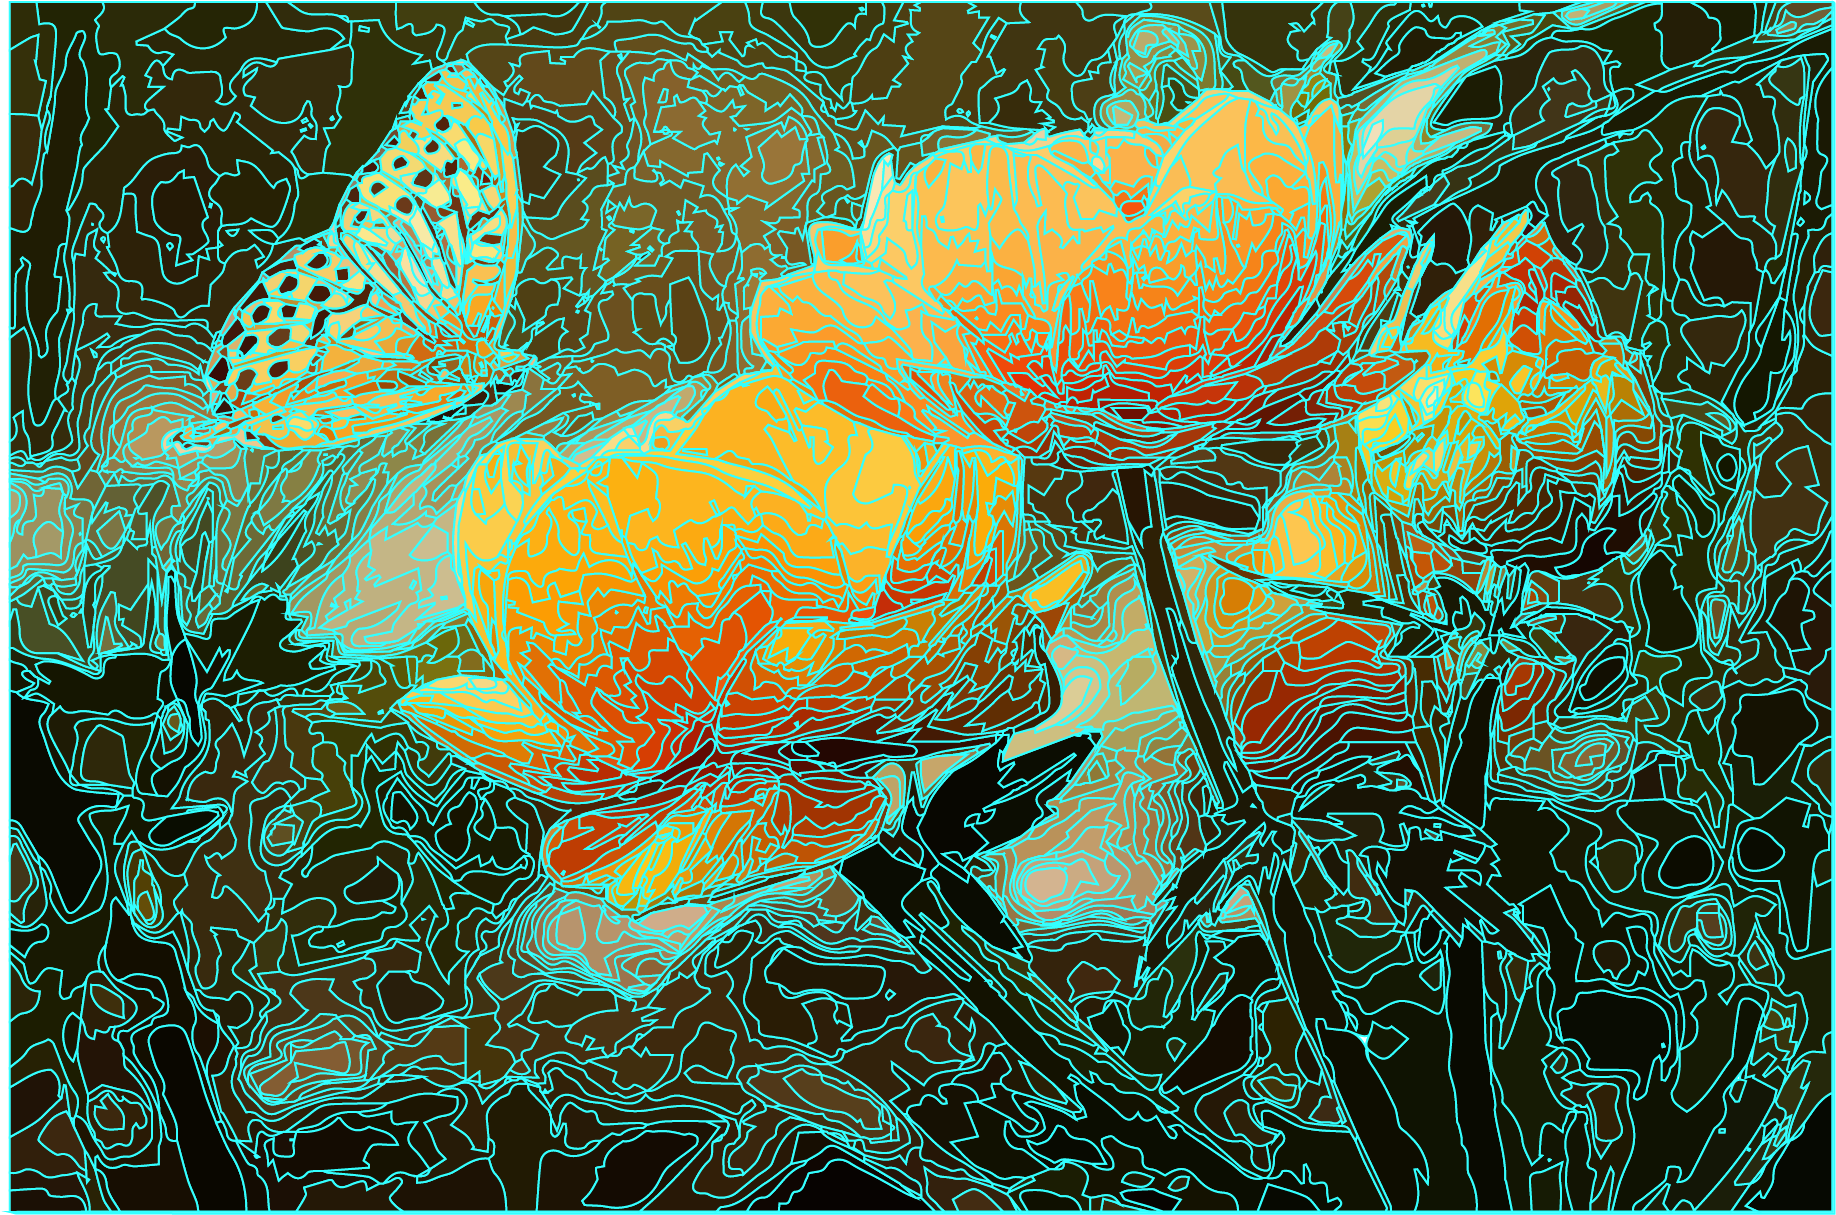
- Config: Preset High Fidelity Photo, Mode Color, Palette Automatic, sliders maxed for detail.
- Fill output: painterly and detailed — genuinely hard to distinguish from the original at thumbnail size. Strong colour separation across the flower petals.
- Stroke view: path count is high, especially in the background bokeh where every subtle colour variation becomes its own closed region. For screen / print this doesn’t matter; for CNC / laser cutting it means more travel moves.
- Watch out: Image Trace stays a “live” trace object until you hit Expand — and on a maxed High Fidelity Photo the Expand step is where Illustrator routinely stalls or runs out of memory, because it’s instantiating thousands of separate path objects at once. The cleaner number isn’t the colour count — it’s the Paths/Anchors readout in the Image Trace panel; chase that down before expanding, not after. Illustrator is also subscription-only now (Creative Cloud), so there’s no perpetual-licence way to get this tracer.
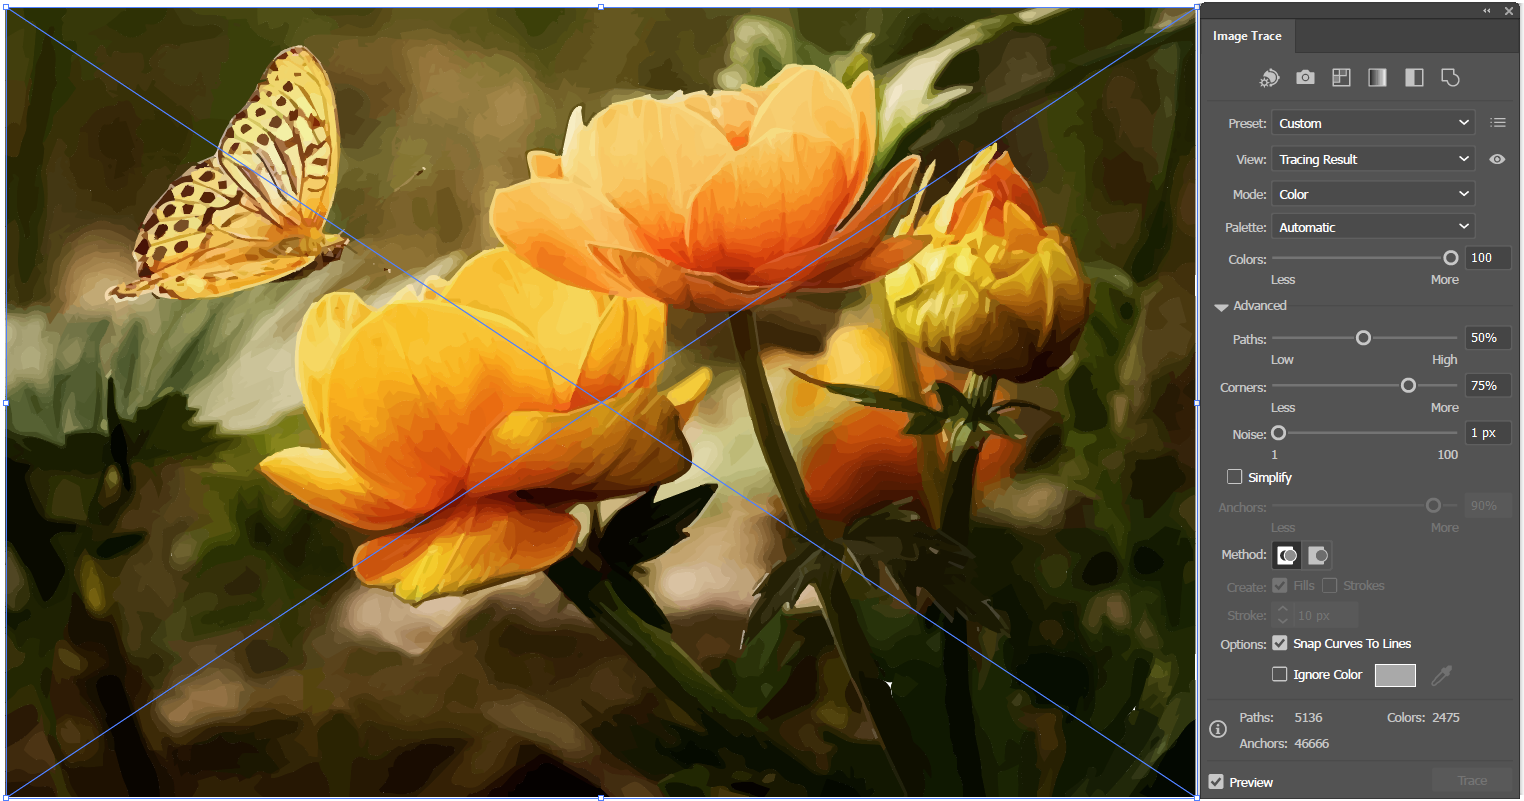
CorelDRAW PowerTRACE

- Config: Image type High quality image, Detail maxed, Smoothing / Corner smoothness balanced, Merge adjacent + Remove overlap enabled.
- Fill output: smooth, painterly. Colour transitions feel soft — closest look to the Vector Magic output of the three tunable tools.
- Stroke view: dense strokes, similar density to Illustrator, but the underlying curves are smoother.
Merge adjacent+Remove overlapdo help cut redundant paths — worth turning on. - The overlap setting is the production-critical one. By default PowerTRACE leaves each colour as a full stacked shape with hidden areas behind the one on top; “Remove overlap” is the option Corel itself documents as the one to enable for vinyl cutters and screen printers, because it trims those hidden areas so the cutter doesn’t slice the same edge twice. Leave it off and your DXF looks identical on screen but double-cuts on the machine.
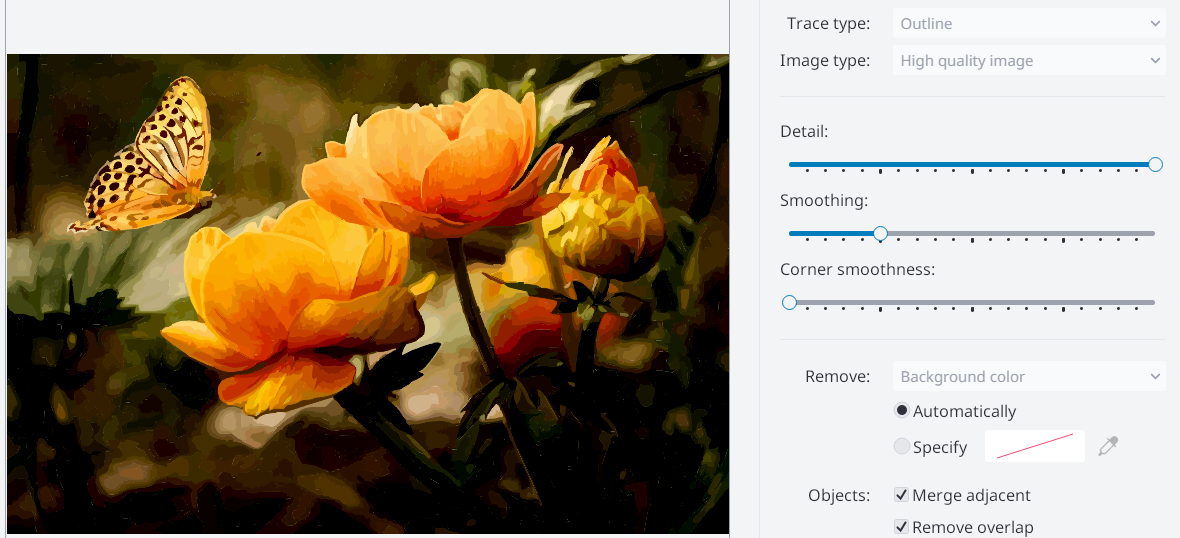
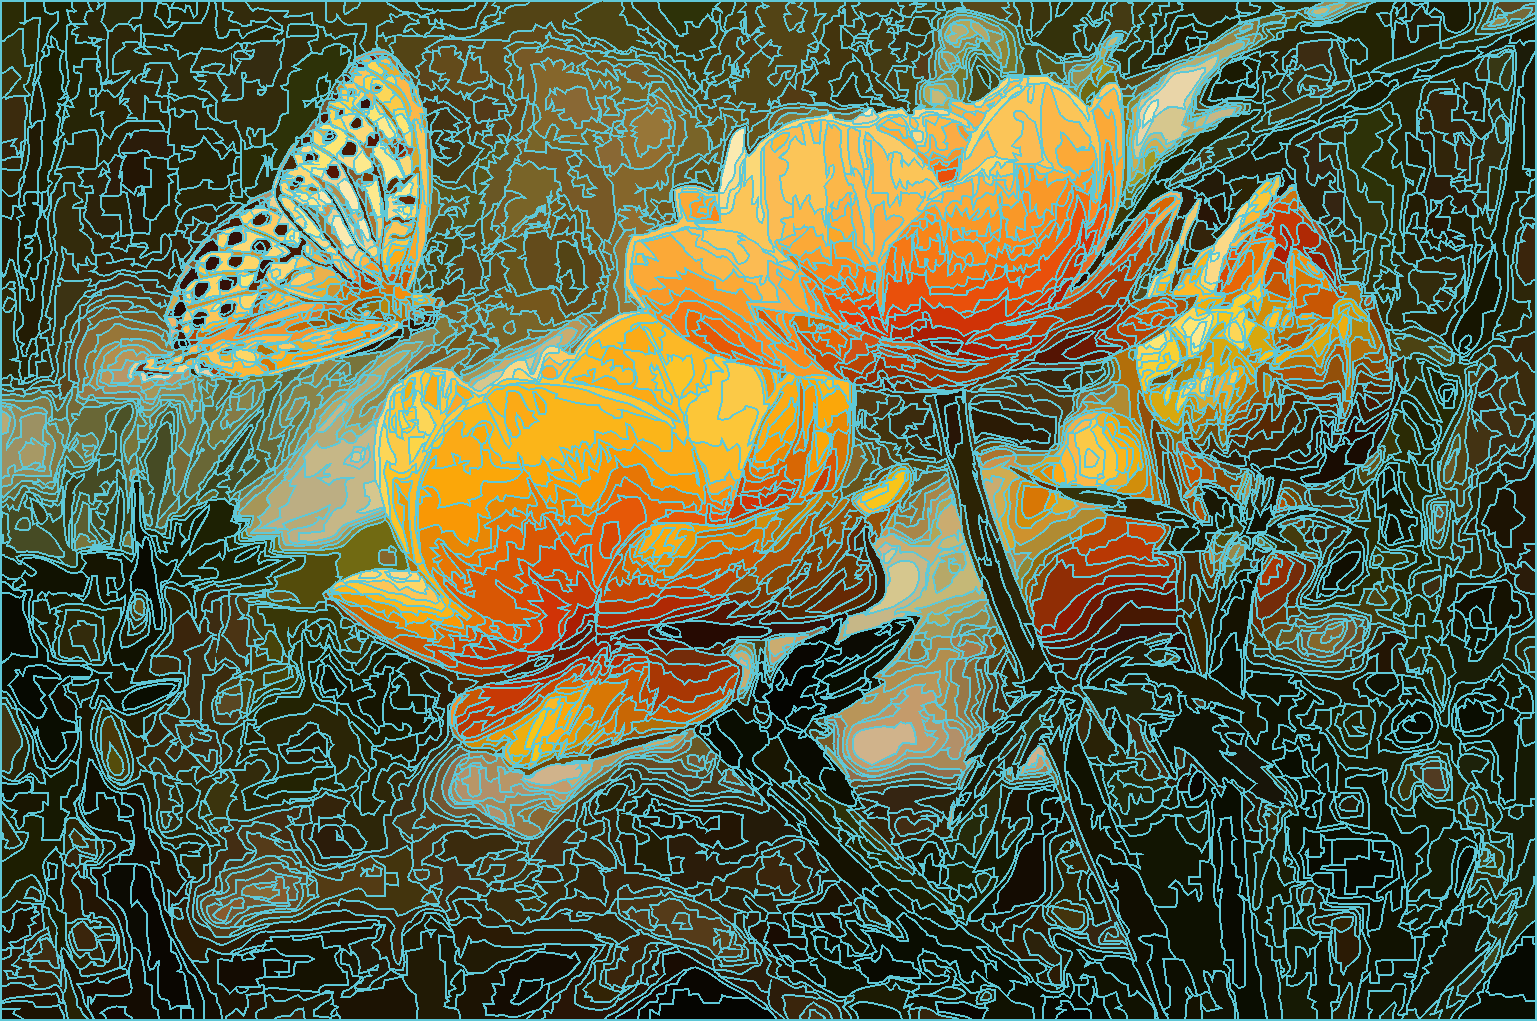
Vector Magic

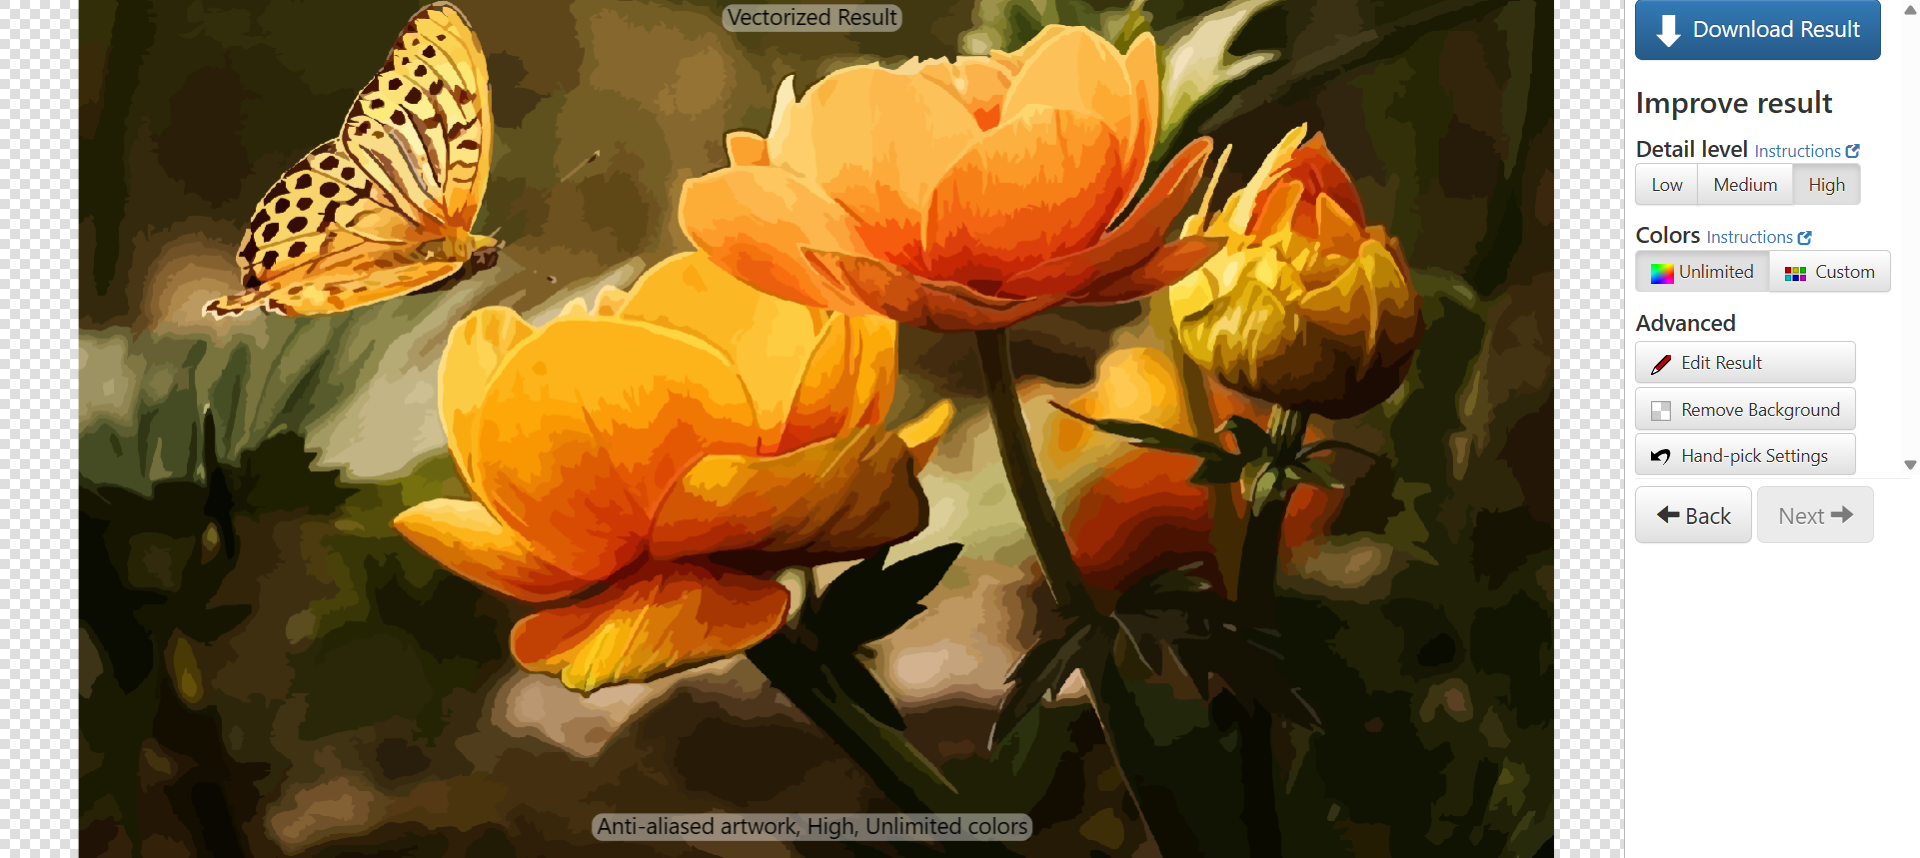
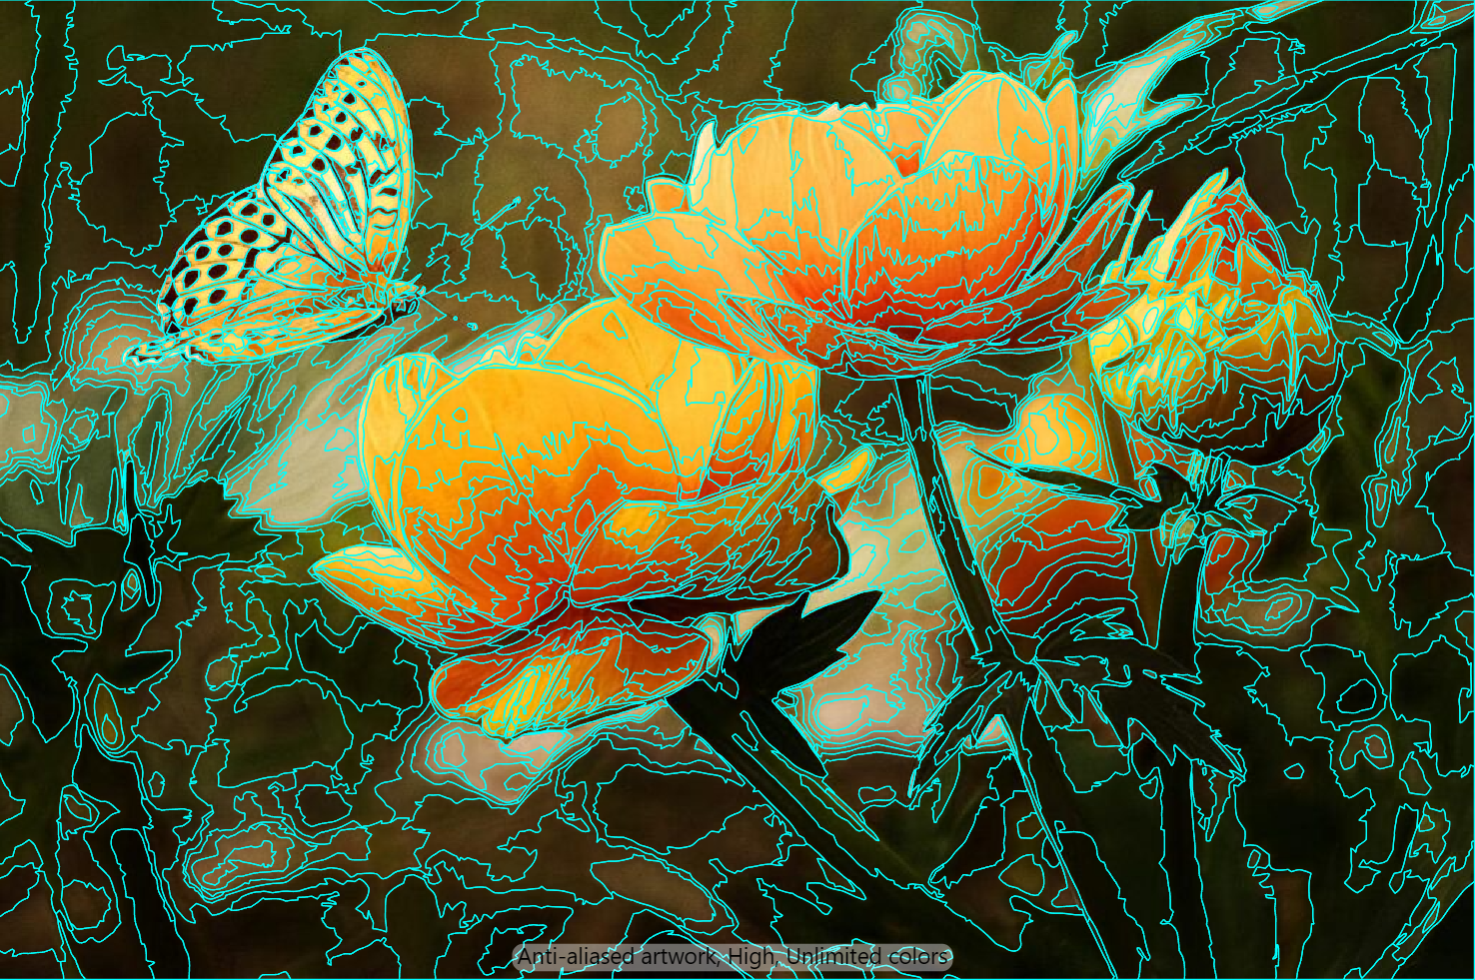
- Config: Detail level High, Colors Unlimited. That’s basically the whole UI — you pick a preset and it decides the rest.
- Fill output: one of the smoothest-looking results. Colours blend naturally, transitions feel almost painted. (The Anti-aliased artwork, High, Unlimited colors text at the bottom is Vector Magic’s trial-mode watermark — not part of the vector output itself.)
- Stroke view: surprisingly the cleanest of the four — thin, flowing lines, the sparsest background path count. Vector Magic’s stroke colour is fixed, which is why I picked cyan as the common colour to match its native output across all four tools.
- Tradeoff: no colour-count control and far fewer configs than the other three. You can’t set an exact number of colours, can’t tune noise filtering, can’t adjust corner/merge thresholds — you pick a preset and Vector Magic decides the rest. Great when the preset fits your image; frustrating when it doesn’t.
- The bigger gotcha is which Vector Magic you buy. The cheap online subscription and the one-time desktop licence are not the same product: Vector Magic’s own docs state the online edition can’t output transparency and can’t selectively remove the background — only the desktop edition can. If you trial it in the browser for a cut-out logo and it bakes a white box behind your shape, that’s the limitation, not your settings — the feature only exists in the paid desktop app.
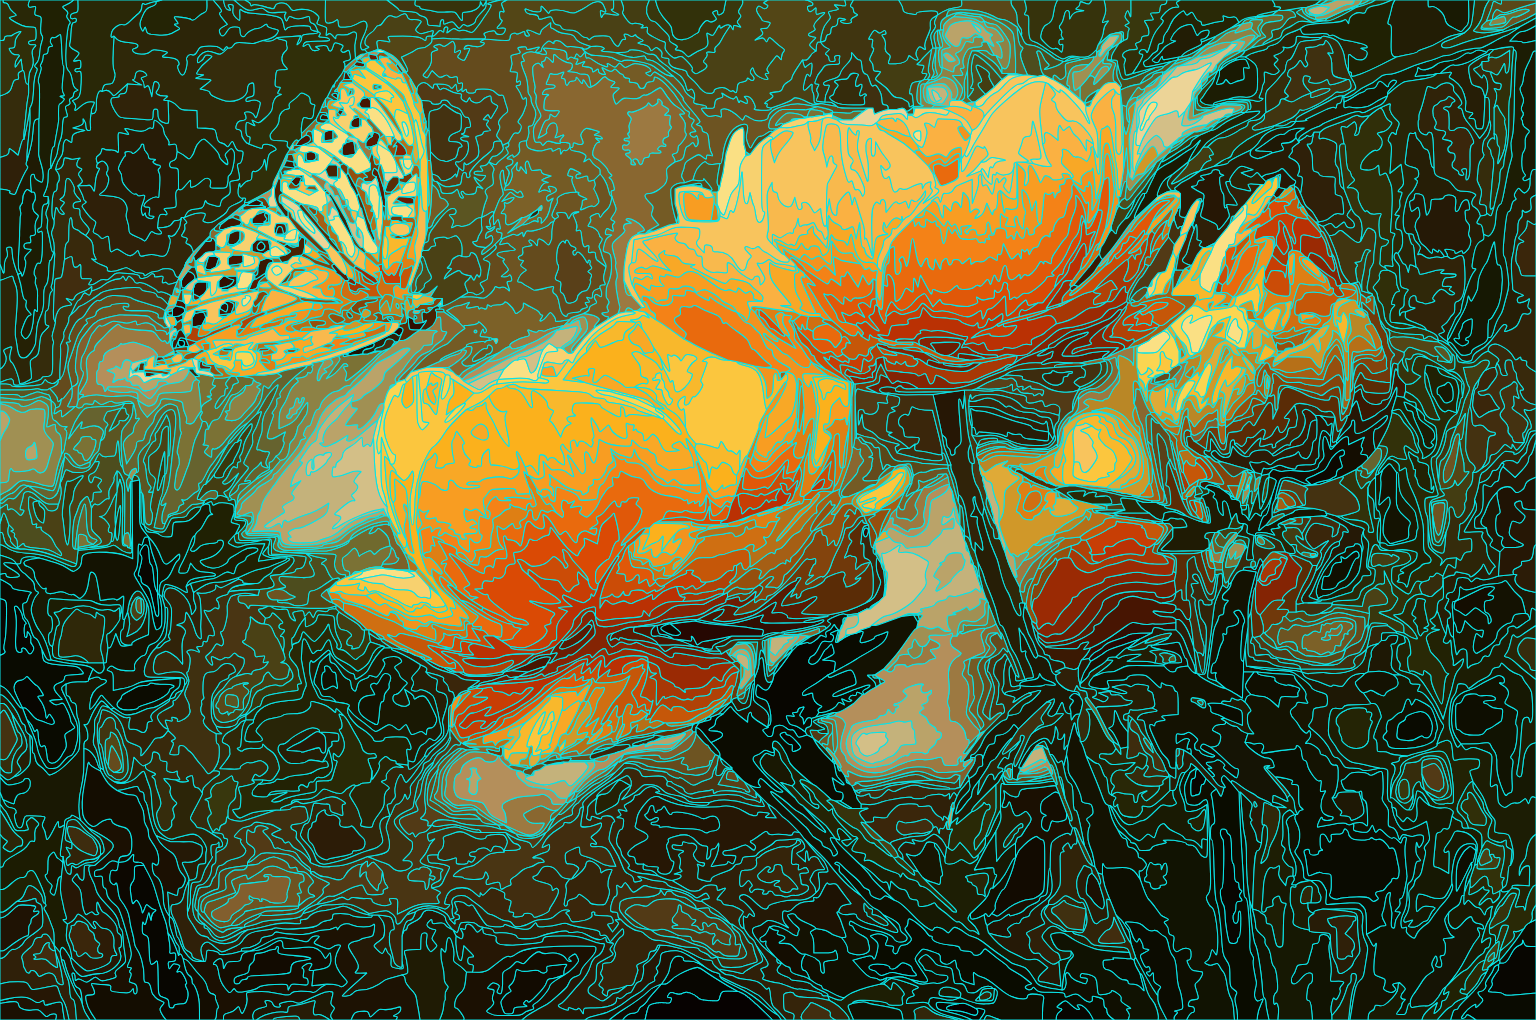
TracePen

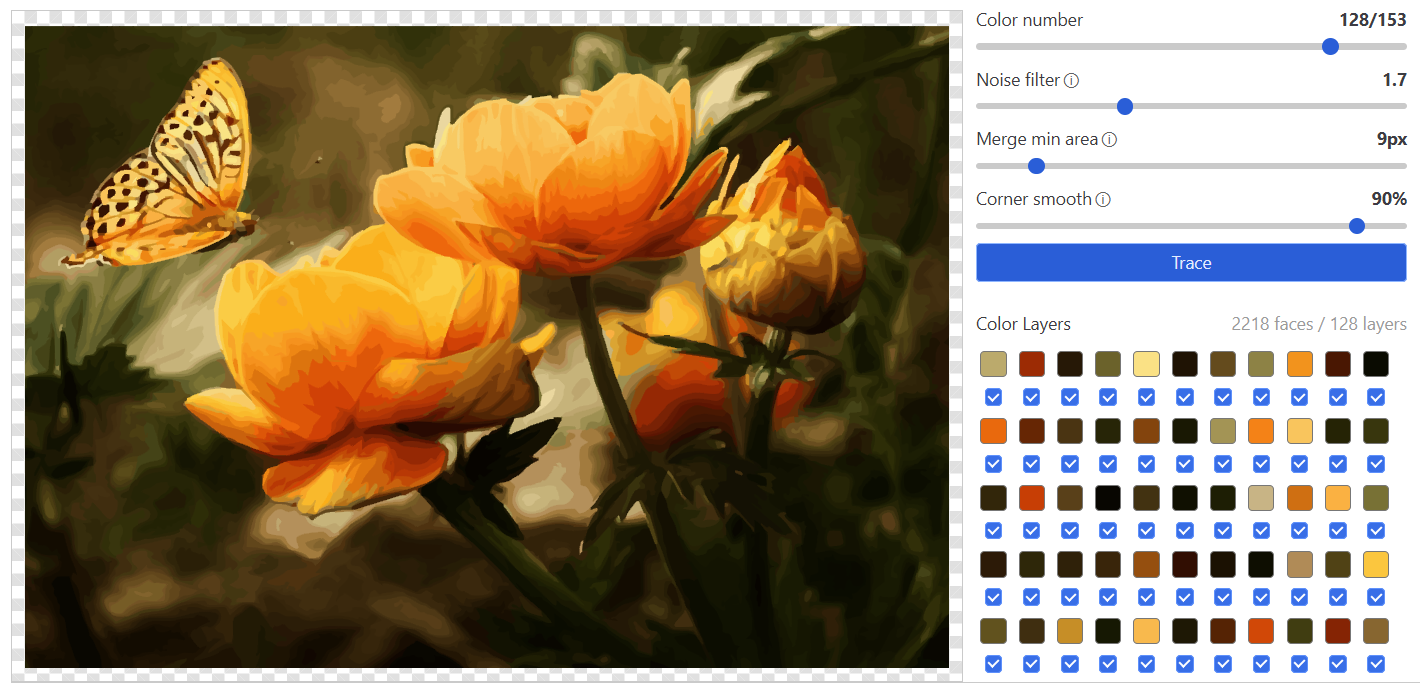
- Config: Color number 128/153, Noise filter 1.7, Merge min area 9px, Corner smooth 90%. All sliders — same kind of control surface as Illustrator and CorelDRAW.
- Fill output: more detail preserved than Vector Magic / CorelDRAW — the fine pattern in the flower petals and the background foliage survives instead of being smoothed into flat blobs. Trade-off: the result looks “rougher” than Vector Magic’s painterly output, because it’s tracking actual colour regions rather than blending them.
- Stroke view: similar overall density to CorelDRAW, cleaner than Illustrator, not as sparse as Vector Magic. The distinguishing property isn’t density — it’s that shared boundaries between adjacent colour regions are tracked as one edge, not two overlapping paths. For DXF Lines export (laser / vinyl cutting), this means no redundant double-cut passes.
- Why this matters for fabrication: every fill-based tracer (Illustrator, Corel, Vector Magic) builds the image as a stack of filled shapes, so the line where two colours meet exists twice — once as the border of region A, once as the border of region B. Export that as cut lines and the machine traces it twice. TracePen’s shared-edge model is the reason a region-boundary is one polyline, not two — that’s the entire point of choosing it for a cutter rather than a screen. If your output is going to a printer or screen, this advantage is invisible and one of the painterly tools may look nicer.
Try TracePen (no signup)
Overall verdict
Vector Magic produces the prettiest fill and the cleanest stroke — the polished, painterly look most people instinctively associate with “good” vector art. The tradeoff: no colour-count control and far fewer knobs. You pick a preset and it decides. When the preset fits your image, great. When it doesn’t, you have no recourse. It also struggles with colour-rich photos — subtle tones get merged or shifted (a common complaint in user reviews).
TracePen goes the other way. You pick the exact number of colours (up to 153 in this test), you tune noise / corner smoothness / merge thresholds, you get a trace that faithfully describes the photo’s actual palette instead of a smoothed reinterpretation. Output looks rougher than Vector Magic’s painterly style — but the detail survives.
Illustrator and CorelDRAW sit in the same control space as TracePen (tunable sliders, exact colour count, per-image tuning) with their own strengths: Illustrator’s detail fidelity, Corel’s smoother curves. Both cost real money — and both are now ongoing subscriptions, where Vector Magic’s desktop edition is still a one-time licence. So the real split isn’t “pretty vs detailed” — it’s screen vs machine: for print/screen the painterly tracers win, but anything headed to a cutter, laser or CNC wants the tracer whose paths actually map one-to-one to the cuts you’ll make.
Share your coupon code — your audience saves 25%, you earn 30% on every sale.
Become an affiliate →