
 Tiếng Việt
SketchUp
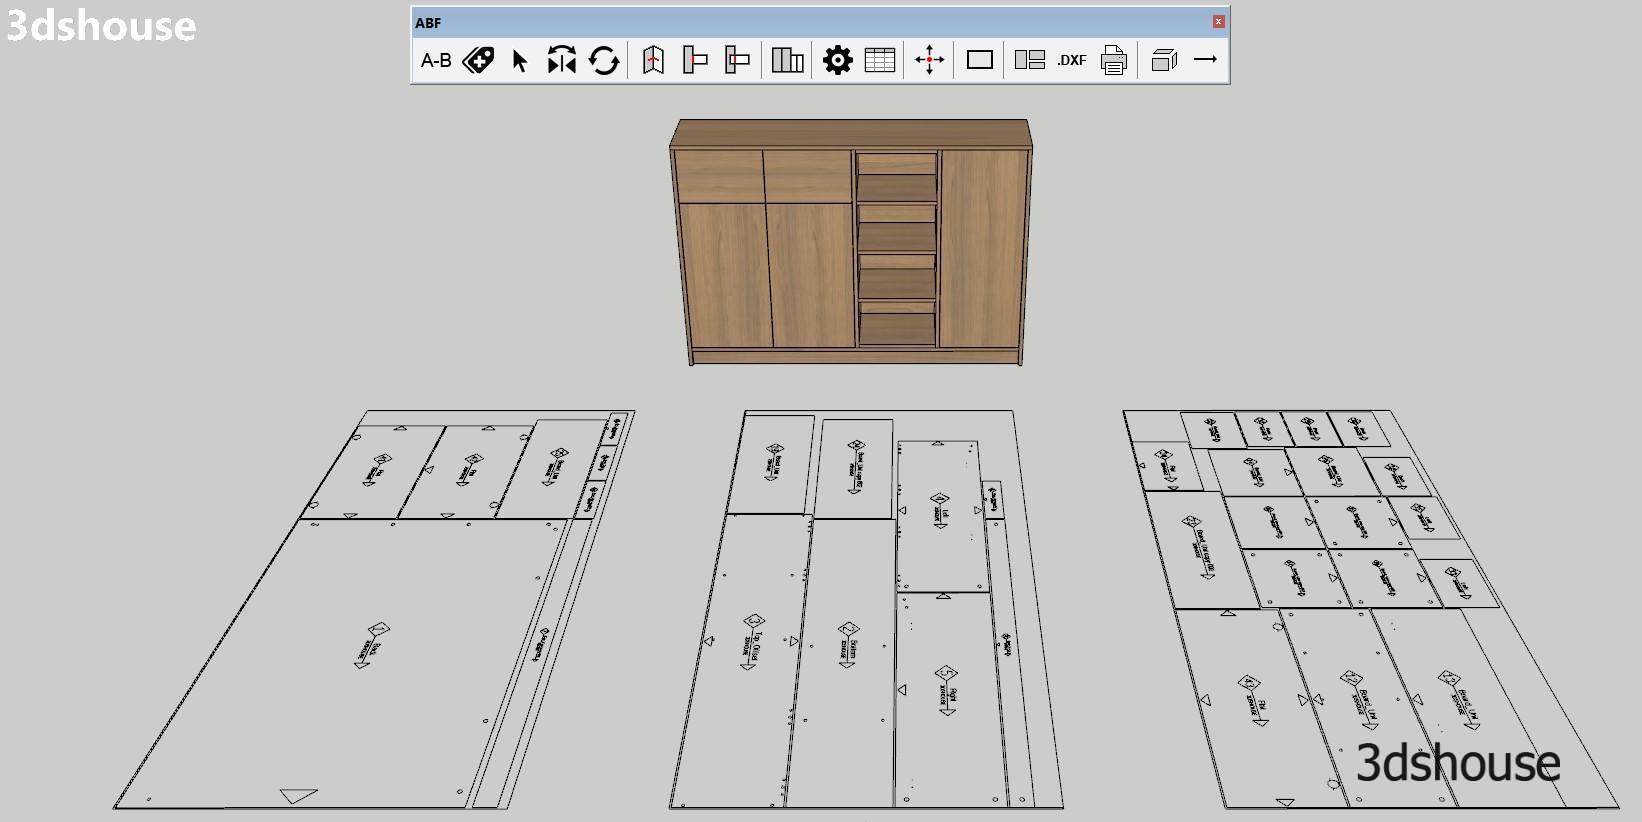
ABF SketchUp Plugin: Free CNC Furniture DXF Export & Nesting
Aug
ABF is a free SketchUp CNC plugin built specifically for furniture production workflows that need to go from a modeled cabinet or panel to a ready-to-cut DXF file without leaving SketchUp. The full name stands for ABF Solution, developed by Vietnamese maker Dang Phi Bao, and it remains completely free for real production use as of 2026 — including nesting, bore holes, edge banding, label export and DXF output. The plugin closes the gap between SketchUp’s modeling environment and specialized CNC machining software such as Aspire, Mastercam, and AlphaCAM: you build the furniture in SketchUp, ABF processes the panels and hardware geometry, and the resulting DXF layers drop straight into your CAM program with minimal rework.
What makes ABF stand out from generic cut-list plugins is its fabrication awareness. It does not just measure panels — it places the actual drilling geometry for hinges, shelf pin holes, cam connectors and screw pockets onto their own DXF layers so the CNC spindle knows exactly where to drill in the same pass that cuts the outline. This removes the manual step of adding machining points inside Aspire or Mastercam after import. For a shop running several cabinets a day, that elimination of per-panel machining setup is where the real time saving accumulates.
ABF also includes a nesting engine that arranges cut parts onto standard sheet sizes automatically, reducing offcut waste before any material is ordered. The nesting preview runs inside SketchUp, so you can see sheet utilisation and adjust part counts or sheet dimensions before committing. Edge banding assignment includes an offset compensation value — the plugin trims the part dimensions by the banding thickness so the finished panel hits the target dimension after banding is applied, which is a detail most free tools leave to the operator to calculate manually. Finally, ABF prints cut labels per panel (panel name, dimensions, material, edge banding callouts) that match the DXF export, so the operator on the shop floor can reconcile the physical stack of cut parts against the nested sheets without a separate spreadsheet.
Key Features
- DXF export with separated CNC layers — ABF writes each machining operation type onto its own named DXF layer: panel outline, hinge bore circles, connector/screw holes, groove paths, and fold lines are all separate. This matters because Aspire and Mastercam assign different toolpaths and bit sizes per layer; receiving a pre-separated file means you set the toolpath rules once, save them as a template, and future imports just work. If you receive a flat single-layer DXF, you would have to re-select and re-assign geometry every time.
- Hinge bore holes and hardware drilling geometry — ABF places standard hinge cup hole geometry (35 mm forstner, 9.5 mm depth, correct setback from edge) directly in the DXF. It also handles shelf pin rows, cam lock connectors, Confirmat screws, and dowel positions. These are placed parametrically based on the hardware spec you assign in the plugin, not drawn by hand. The CNC reads the circles and routes accordingly — no manual point entry in the CAM software.
- Sliding door and backboard grooves — Groove paths for sliding door tracks and dado grooves for backboards are exported as polyline paths on their own layer. You define the groove width and depth inside ABF; the plugin generates the centreline path that the CNC router follows at the specified depth. This handles a common furniture detail that most cut-list plugins ignore entirely.
- Nesting engine with sheet utilisation preview — The nesting tool arranges all panels from the current model onto standard sheet sizes (e.g. 2440 × 1220 mm) and shows utilisation percentage per sheet inside SketchUp before export. You can set grain direction constraints so panels that require a specific grain orientation are not rotated freely. The nesting result feeds directly into the DXF export — nested positions are encoded so Aspire/Mastercam receives parts already laid out on virtual sheets.
- Edge banding assignment with offset compensation — Each panel edge can be tagged with a banding spec (colour, thickness, material). ABF records which edges get banding and applies a dimensional offset equal to the banding thickness to the corresponding panel dimension in the DXF. The finished part size in the DXF is the pre-banding (raw) size, so when banding is applied the assembly reaches the nominal designed dimension. This compensation is automatic once banding thickness is configured — no mental arithmetic per panel.
- Label printing per panel — ABF exports a label for each cut panel showing: panel name/ID, raw dimensions (post-offset), material, sheet reference, and edge banding callout per edge (e.g. “T: 0.5 mm PVC / B: none / L: 1 mm PVC / R: 1 mm PVC”). Labels can be printed directly or exported and given to the shop floor. The label IDs match the nesting sheet references so operators can identify which sheet each part came from at a glance.
ABF vs OpenCutList — Which Free SketchUp CNC Plugin to Choose
The closest free alternative to ABF is the actively maintained OpenCutList plugin (v5/v6, cross-platform Windows and Mac, SketchUp 2017+), which covers cut-list statistics, cutting diagrams, labels and DXF/SVG export. The key difference is fabrication intent: OpenCutList describes panels for cutting and reporting, but it does not generate the machining geometry ABF produces — hinge cup bores, connector holes, screw drilling and hardware placement. That joinery-and-hardware layer is exactly what a nesting CNC needs to drill in one pass, and it is ABF’s main reason to exist.
If your shop only needs a cut list and basic DXF outlines for a router that you program manually, OpenCutList works fine and runs on Mac. If your workflow requires pre-programmed drilling geometry and nesting in the same export — and you are on Windows — ABF is the better fit. Many shops use both: OpenCutList for quoting/ordering (material quantities, cost estimates) and ABF for the actual CNC file that goes to the machine.
How to Install and Use
- Download the .rbz file. Get it from the 3dshouse mirror or from getabf.net (the author’s site also hosts the latest build and a changelog). Save the file somewhere you can find it — your Downloads folder is fine.
- Install in SketchUp. Open SketchUp, go to Window → Extension Manager → Install Extension, navigate to the downloaded ABF.rbz file and click Open. SketchUp will ask you to confirm the install from an untrusted source — click Yes. You only need to do this once; the plugin loads automatically on every subsequent launch.
- Access ABF from the Extensions menu. After installation a new ABF menu entry appears under Extensions (and optionally a toolbar). Open it to launch the ABF panel manager dialog.
- Prepare your model before using ABF. ABF reads SketchUp component names, material names and layer/tag assignments to identify panels. Before running ABF: (a) make sure every board is a separate component or group; (b) give each component a descriptive name (e.g. “Left Side 18mm MDF”) — ABF uses the component name as the panel label; (c) assign a material with a name that includes the thickness (e.g. “Birch Ply 18mm”) or set the thickness explicitly in ABF’s panel list. Skipping this step leads to unnamed panels and wrong thickness groupings in the nesting output.
- Assign hardware in the ABF panel manager. Select a panel, click into its hardware tab, and add bore holes by hardware type (hinge cup, shelf pin, cam connector, etc.). Set the edge setback, spacing and hole count. ABF places the hole geometry relative to the panel geometry in SketchUp and writes it to the DXF on the correct layer.
- Configure edge banding. In the panel manager, set the banding thickness and material for each tagged edge. Enable the offset compensation toggle so ABF adjusts raw dimensions automatically. You can create banding presets (e.g. “0.5 mm PVC white”, “2 mm ABS oak”) and reuse them across panels.
- Run nesting. Open the Nesting tab, set your sheet size and kerf width (saw cut width, typically 3–4 mm for panel saws, 6–8 mm for routers). Set grain direction if applicable. Click Nest — ABF arranges the panels and shows utilisation. If utilisation is low, you can manually override some rotations or add off-cuts as usable stock.
- Export DXF. Click Export DXF. Choose an output folder. ABF writes one DXF file per sheet. Open the file in Aspire, Mastercam or AlphaCAM: each layer corresponds to a machining operation. Apply toolpath rules per layer (outline: 10 mm straight bit, 18 mm deep; bore holes: 35 mm forstner, 9.5 mm; grooves: 6 mm straight bit, 10 mm deep — adjust to your hardware).
- Print labels. Use the Label Export function to generate per-panel labels. Print them and attach to the cut parts as they come off the CNC, before they move to the edge bander. This keeps the stack in order and prevents mix-ups on the assembly floor.
Pro Tips
- Name components with material and thickness first. ABF’s panel grouping logic for nesting is driven primarily by material name and thickness. If you use generic names like “Group#1” or “Component#3”, ABF cannot distinguish 18 mm MFC from 16 mm plywood and nests them together, causing the CNC to use the wrong bit depth. A naming convention like “18mm MDF — Left Side” takes seconds to set up and prevents re-nesting on the machine.
- Export DXF layers as a CAM template once, reuse forever. The first time you import an ABF DXF into Aspire or Mastercam, spend 20 minutes mapping each layer name to the correct toolpath. Save that as a named template or job setup. On every subsequent import, load the template and the CAM software assigns toolpaths automatically. ABF layer names are consistent across exports (they do not change with panel names), so the template remains valid across projects.
- Use the kerf compensation field, not panel size adjustments. Some operators manually reduce panel dimensions in SketchUp to account for saw kerf. This corrupts the model dimensions and makes the SketchUp drawing unreliable for assembly reference. Instead, enter the kerf width in ABF’s nesting settings. ABF adds the gap between nested parts during layout — your SketchUp panels stay at nominal finished size.
- Check nesting sheet utilisation before ordering material. Run nesting on the full cabinet set before placing a sheet goods order. ABF’s utilisation number tells you exactly how many sheets you need. If you are at 87% on sheet 3 and 23% on sheet 4, rearranging one or two panels (or adding a filler part from the next project) can consolidate to three sheets and save one full panel. This is worth doing on any job with more than 10 parts.
- Bore hole setback for hinges: verify against your hinge spec, not a generic value. The standard European hinge cup setback is 22.5 mm from the edge of the door panel to the centre of the 35 mm bore. However, some hinges (especially clip-top or compact variants) use 22 mm or 23 mm. ABF lets you set the setback value per hole type. If you use a single default value across all hinge types without checking, doors will close with a small gap or bind — a mistake that only shows up after the parts are cut and assembled.
System Requirements
- SketchUp version: 2018 through 2025 (SketchUp Make 2017 is not supported; use 2018 or later)
- Operating system: Windows only. There is no Mac/macOS build of ABF — the developer cites a lack of funding to maintain a Mac version. Cut-shop workflows that depend on ABF must run on Windows.
- CNC software compatibility: Tested with Aspire (Vectric), Mastercam, and AlphaCAM. The DXF output uses standard R2010 format, which imports into any DXF-capable CAM software.
- Cost: Completely free, including all features. No trial limits, no subscription tier.
Download ABF
Download ABF.rbz — free, Windows only, SketchUp 2018–2025.
For the latest build, feature requests and active support, the plugin is also distributed and discussed by the author on the getabf.net website and the ABF — furniture CNC thread on the SketchUp Community forum.